Add Category
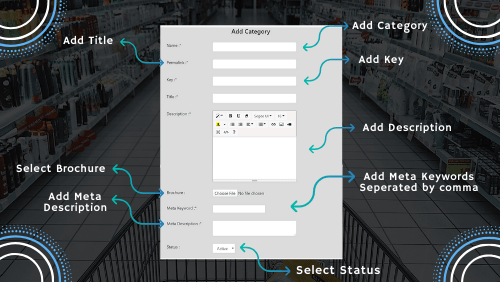
Find Manage Categories under the Products tab in the admin dashboard area. On the top, you will see Add New Category with a plus sign. Click it and a popup like a screen will appear to add a category. First is the name field that allows you to type a name of your choice. Then again, adding the category name will validate the availability of permalinks for the same. You can change the permalinks if you want, according to the need.
The other important field here is the key element of the category. The key element marks a unique authentication of the categories. Hence it should be different for each category. Title and description of the category is also an integral element and hence should be written appropriately. The title and description field will aid in the process of purchase. It should match the search preferences of the customers. Provide title in text format and description field is accessible in the form of the text area. The benefit of using text area in the description is that it lets you choose the desired font family, font size, etc. of the added content. You can make the text look bold or italic by selecting the commands.
The bold command will highlight your desired text. Alignment of the content can also be done using the center, left or right button. Similarly, it allows you to upload any media files. You can also attach a brochure to the category if you want by choosing and uploading files from your desktop or media. You can leave the brochure field empty as it is optional. Adding Meta keywords and Meta description of the category is an essential step. This is because the better the keywords and description here, the more is the chances of getting listed on the top of Google. You can’t skip entering Meta keywords and description for categories and hence make this selection wisely.
Lastly, the status of the category is again one of the crucial elements as it will help decide whether the selected category is visible on the frontend. There are two options in status fields - one is active and the other is disabled. You can either choose active or disabled based on the need. If you will choose active, your product will be live on the website and if you will choose disabled, then your product will not be live on the website. After adding all the details, the last step is to click the save button to publish the category. It will depend on your choice that you have choosen from the dropdown that your product will be live or not.
