MARKETING
The term marketing enhances the sale and purchase of goods and services. It is very important to do the right kind of marketing to attract a large audience. One essential ingredient of marketing is to convince customers to buy products, which requires promotional activity. Hence in this section, we will study the different means of marketing and how they influence the purchase preferences of customers.
The different ways to promote the marketing of products and services here are by using coupons, managing emails, and SMS. All these factors constitute the essentials of marketing. Let’s discuss them one by one in detail.
Coupons
A. Add Coupon - Coupons are a great source of marketing and are often used to endorse products and services. You just need to create a coupon code and add a subsequent amount to it. The amount added will automatically be deducted from the total price when the particular coupon is applied.
The customers have to copy the coupon code and apply it during the checkout following which they are eligible to get a discounted price. Adding a coupon is as simple as using it. Let’s study how to add coupons. Below are instructions to add coupons.
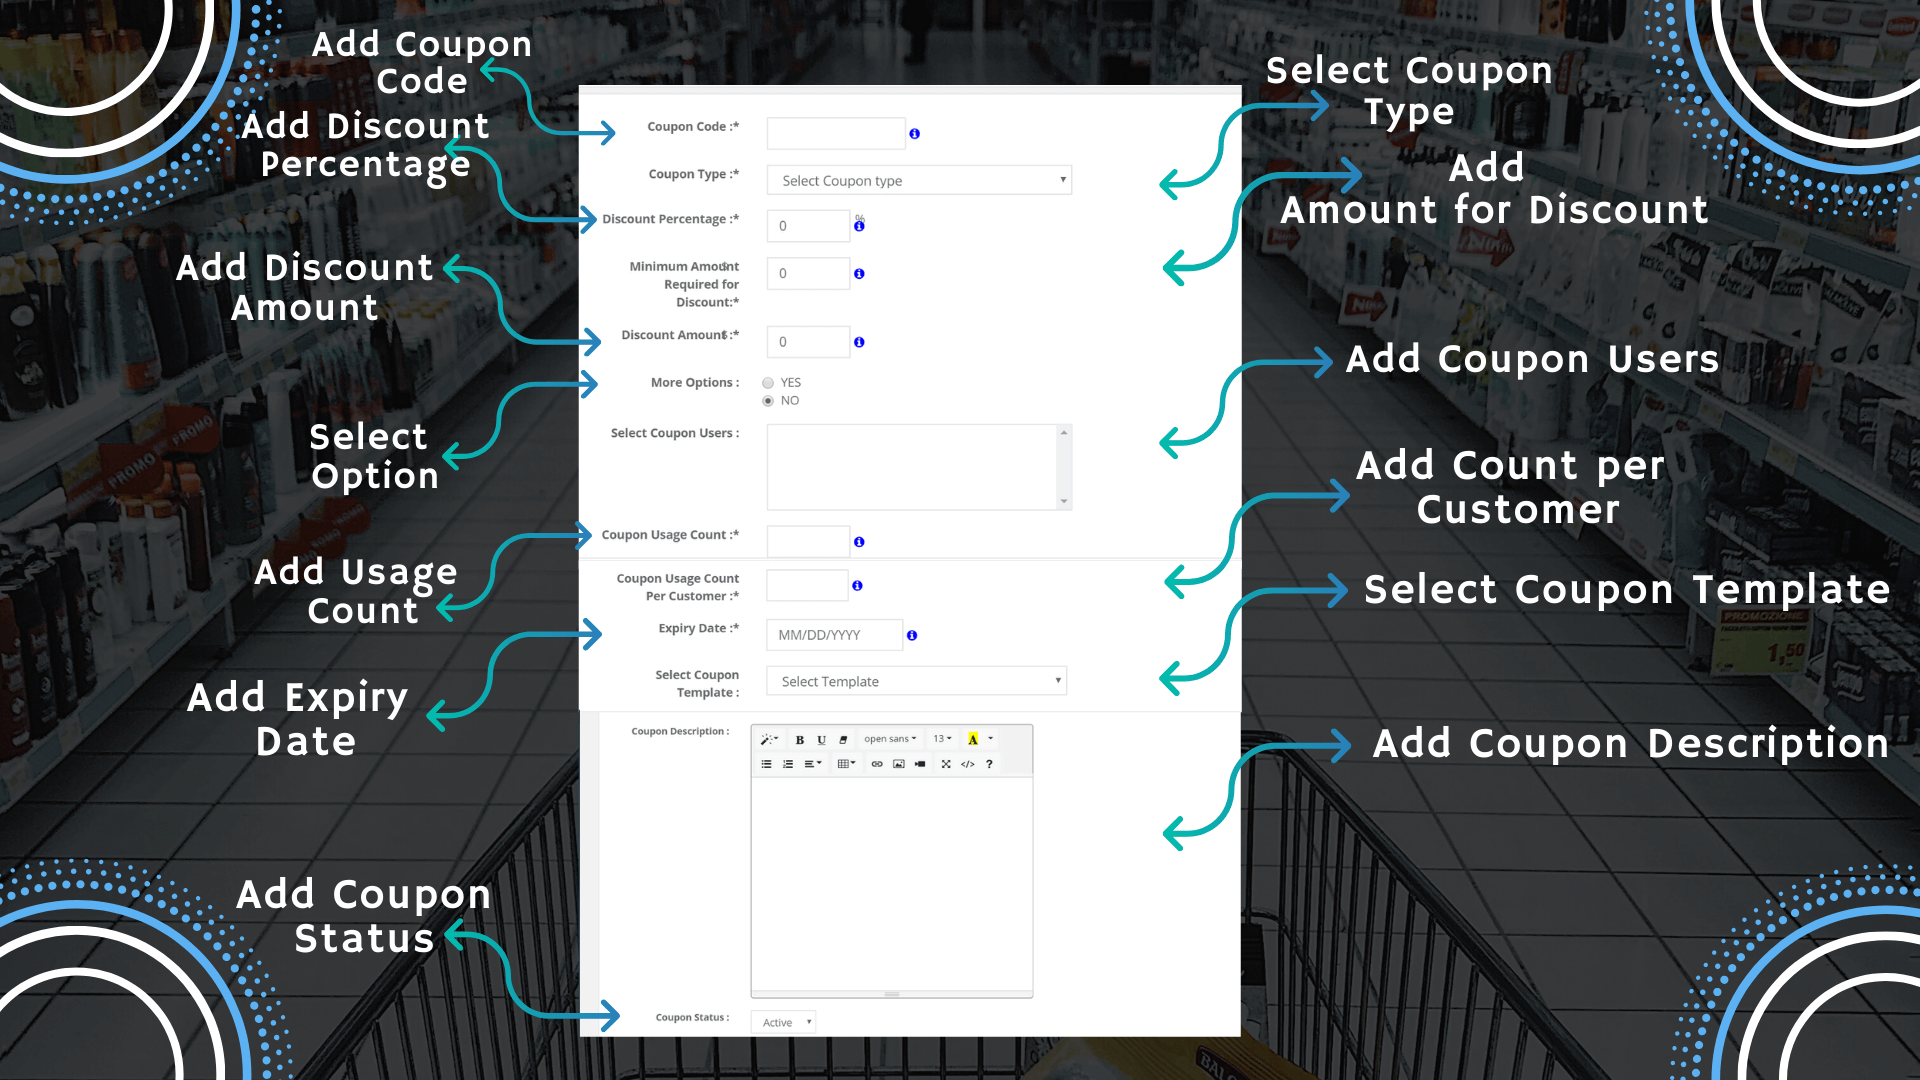
- Start by adding information.
- Enter coupon code in the first dialogue box.
- Another important field is to select the type of coupon to apply to the cost of the product.
- The coupon type will decide how the amount will be deducted from the total product price in the cart.
- The price is subtracted from the total price during checkout. The input can be provided here as a percentage value or a fixed amount.
- There are many options available in the coupon select box to enable conditions on the total price.
- It will be applied accordingly to the criteria set in here in the dashboard area.
- The visibility of the coupon's front end is managed by the admin only.
- The next step is to write a discount percentage in numbers.
- The percentage sign will automatically append to the number entered in the field.
- You can also specify the minimum amount in the discount section.
- Choose more options by selecting either yes or no in the dropdown.
- Now select users for whom the coupon code is valid.
- You can select any user by specifying them. The rule is to add one user per row.
- You can’t mention different users here using a comma; you have to use one option in one row as per the rule.
- Further, you can also mention the total count for the application of the coupon.
- Along with this, it is easy to hold restrictions for the application of coupons for a particular user.
- Specify the coupon count here. You can set the expiration date of the coupon.
- The template to display coupon frontend can also be selected from here.
- Select the desired template from the dropdown.
- Add coupon description in the description dialogue box.
- Lastly is to set the active or disabled status of the coupon.
The active status of the coupon will decide whether the coupon will be displayed front end.
B. Manage Coupon - The admin can manage all coupons in one place that is in the “Manage Coupons” section. The manage coupon tab is helpful to rectify or delete the incorrect content added in the coupon section. Here you will see a list of coupons that have been created previously.
It is easy to delete or modify an existing coupon using icons placed in the Actions column. However, one should open a coupon first to edit it. You can modify a coupon using a pencil icon in the Actions and make changes to it. While editing a coupon, the admin can view complete details of the coupon.
The other minor details such as expiry date, the discount amount can however be evaluated for all coupons in a single instance. There is no need to even use the edit operation. This has been possible due to the table structure that lets you quickly review all coupons.
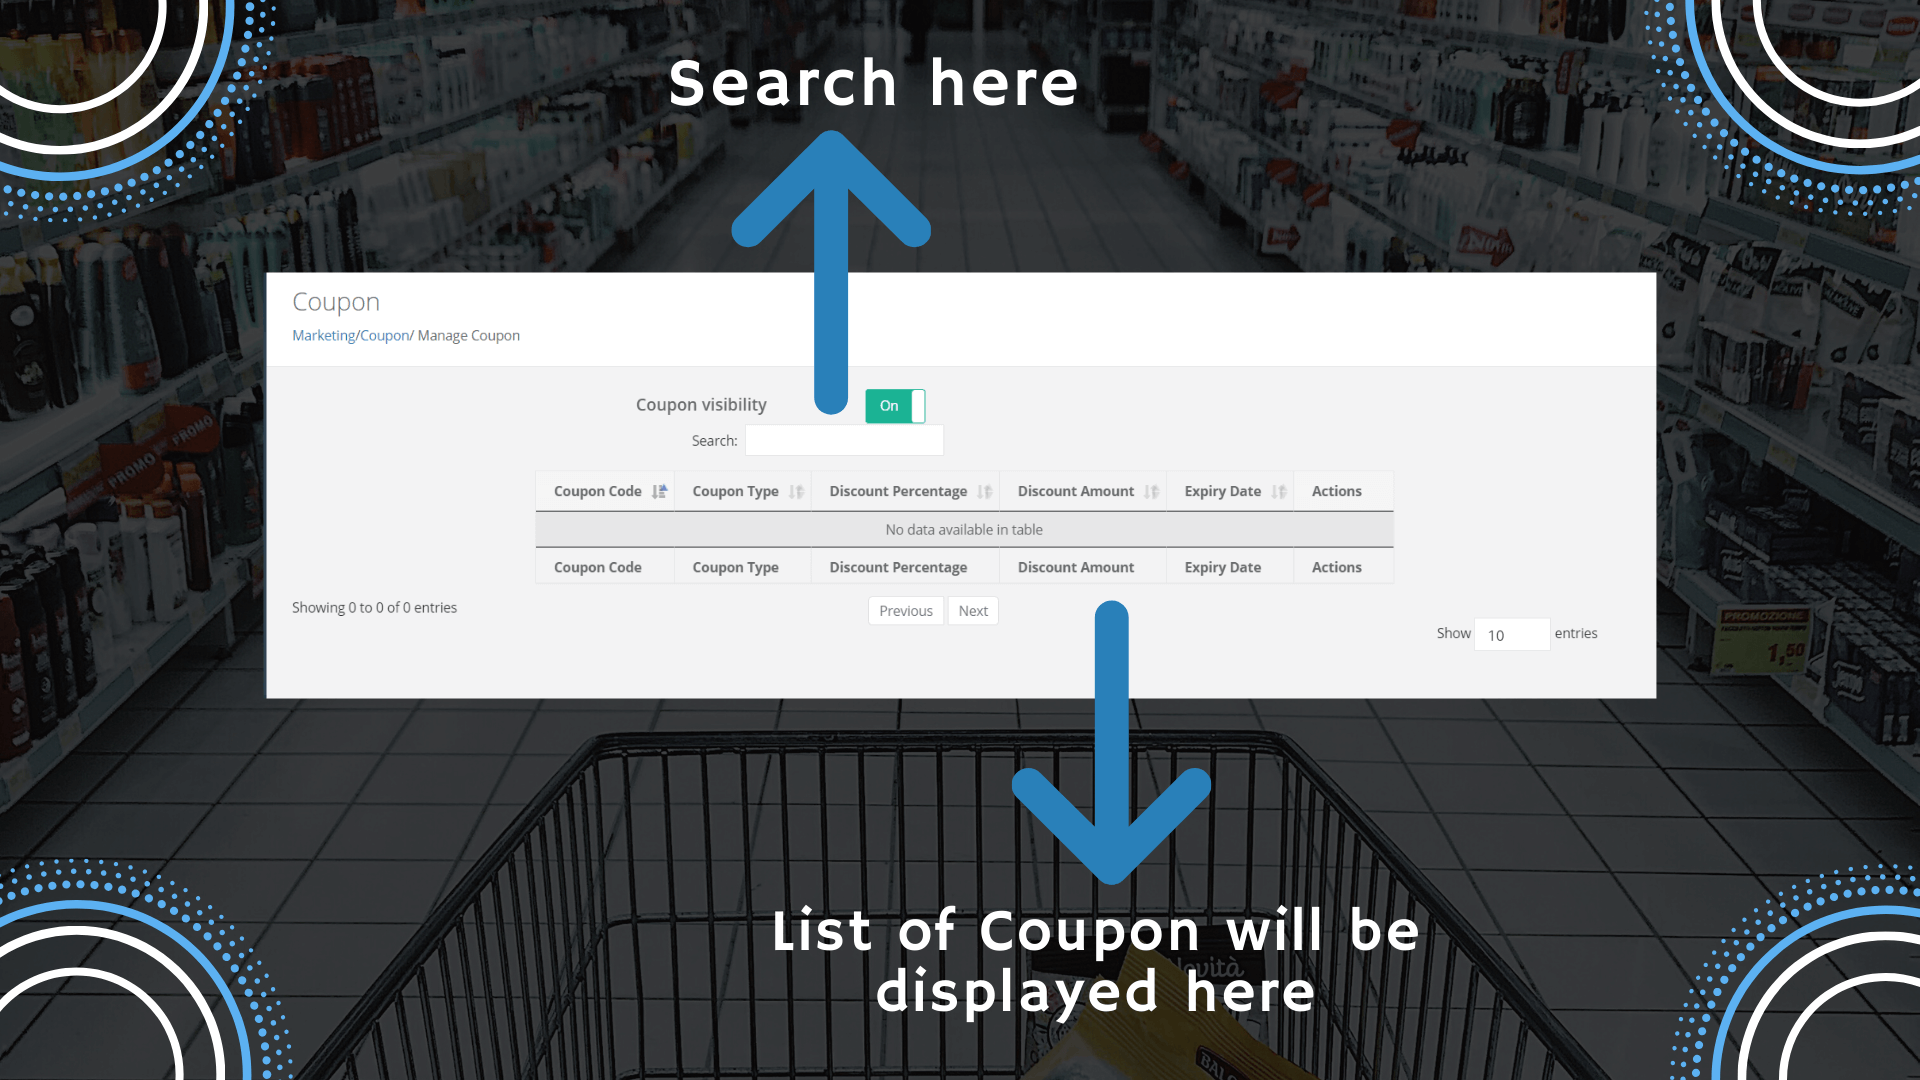
Starting from the top, the visibility of coupons created in the “Add Coupons” section can be switched on and off. You just have to slide from left to right to set an option. The visibility option will decide whether to show coupons front end. Moving on to next, you can also search for a coupon by typing in the search dialogue box. Below the search box is a list of the table containing all coupons that are available for modifications.
- Click on a particular coupon to modify it.
- Edit details of the coupon as required.
- You can easily change coupon codes, discount percentages, discount amount, expiry date, etc.
- It is also easy to delete a coupon by selecting the desired action.
- The controlled navigation buttons are available at the bottom to let you browse through different coupons.
- There could be several coupons available. The navigation buttons make way to the next and the previous lists of the coupons.
C. Coupons Template - The coupons template tab shows you a list of templates from the “Add template” section. All the templates created earlier are shown in this tab in the form of a table-like structure.
The admin is now accountable to make changes to the existing coupon template. You can’t add coupons template here, it can only be managed in this section. The manage operation is handled using the icons in the Actions column. These icons are used to edit or delete a template. Other icons are also available to perform a suitable action. You can understand the meaning of icons by hovering over that particular one. A description of the icon will appear on its hover.
Again, the previous and next buttons are available at the bottom to search through different templates. However, it will come into use only when there are a large number of templates to handle. By default, only 10 coupon templates are visible when you open the tab but you can change it to more rows. It can be done by selecting the option from the dropdown.
A search field box is also available at the top. This lets you type anything in the text box and correspondingly a coupon template appears if it matches any keyword. It is completely optional to use this box. However, you can use it to customize your search and makes it easy to find a particular template.
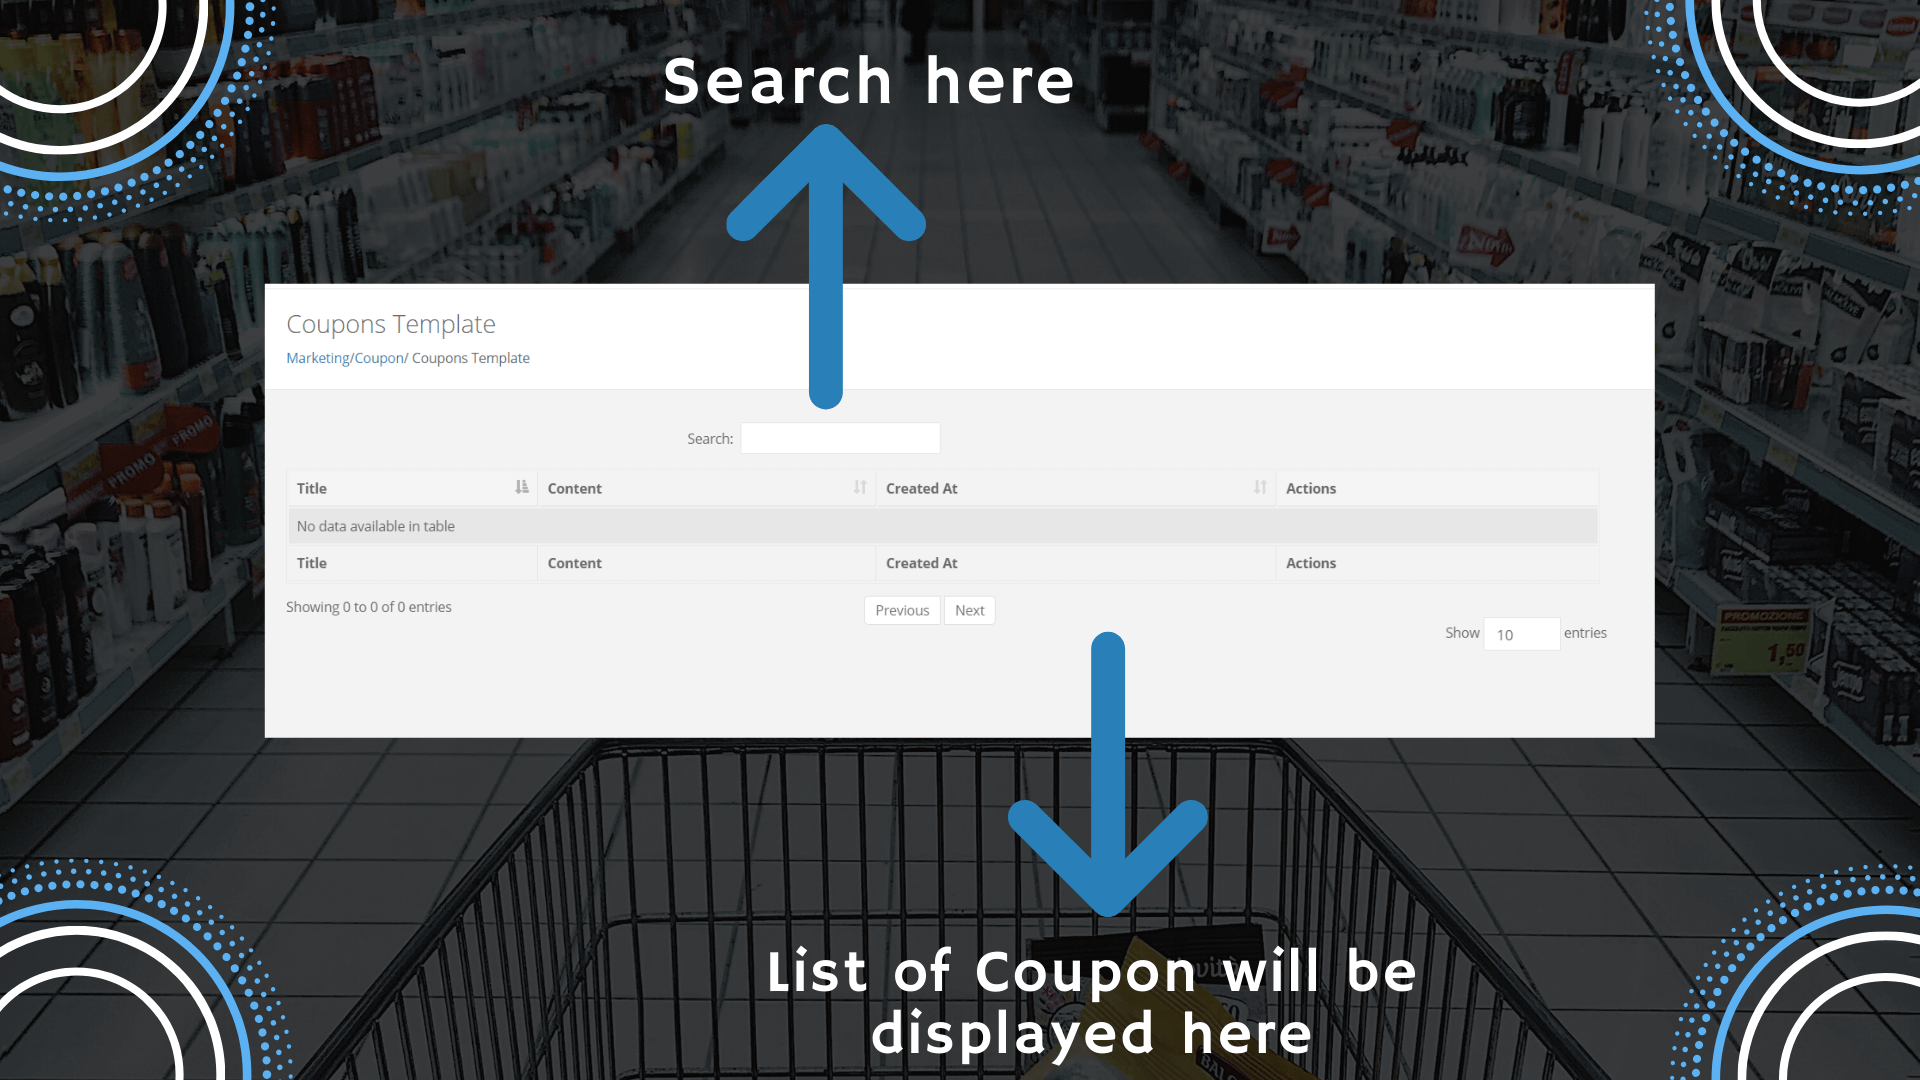
To make changes in the template, the admin is required to edit it. However, some information can be viewed for all templates without having to edit it. The “created at” field visible in the table displays the date format by which the template is created. The date adds automatically when the template is designed. The action field contains functionalities to either delete a template or modify it. Feel free to do any changes in the title, description, or status field and then save it later.
D. Add Coupons Template - This section allows you to create a brand new template for the coupons. The template will decide how the coupons will look like on the front of the website. You can modify it in the coupons template tab. By adding a coupon template, it is allowing the admin to take charge of the designing of the coupon code. It is crucial to present coupons in a way that attracts customers. Moreover, customers can easily apply it during the checkout. Designing the coupons is thus equally important.
The coupon template should be designed in a way that promotes easy use of the codes. The template must look professional and simple at the same time. The customers are just going to copy the codes and paste them while checkout. Adding a coupon template doesn’t involve any complex procedure. It just requires 3 4 basic things that sum up the process of submitting templates. Let’s study how it is done.
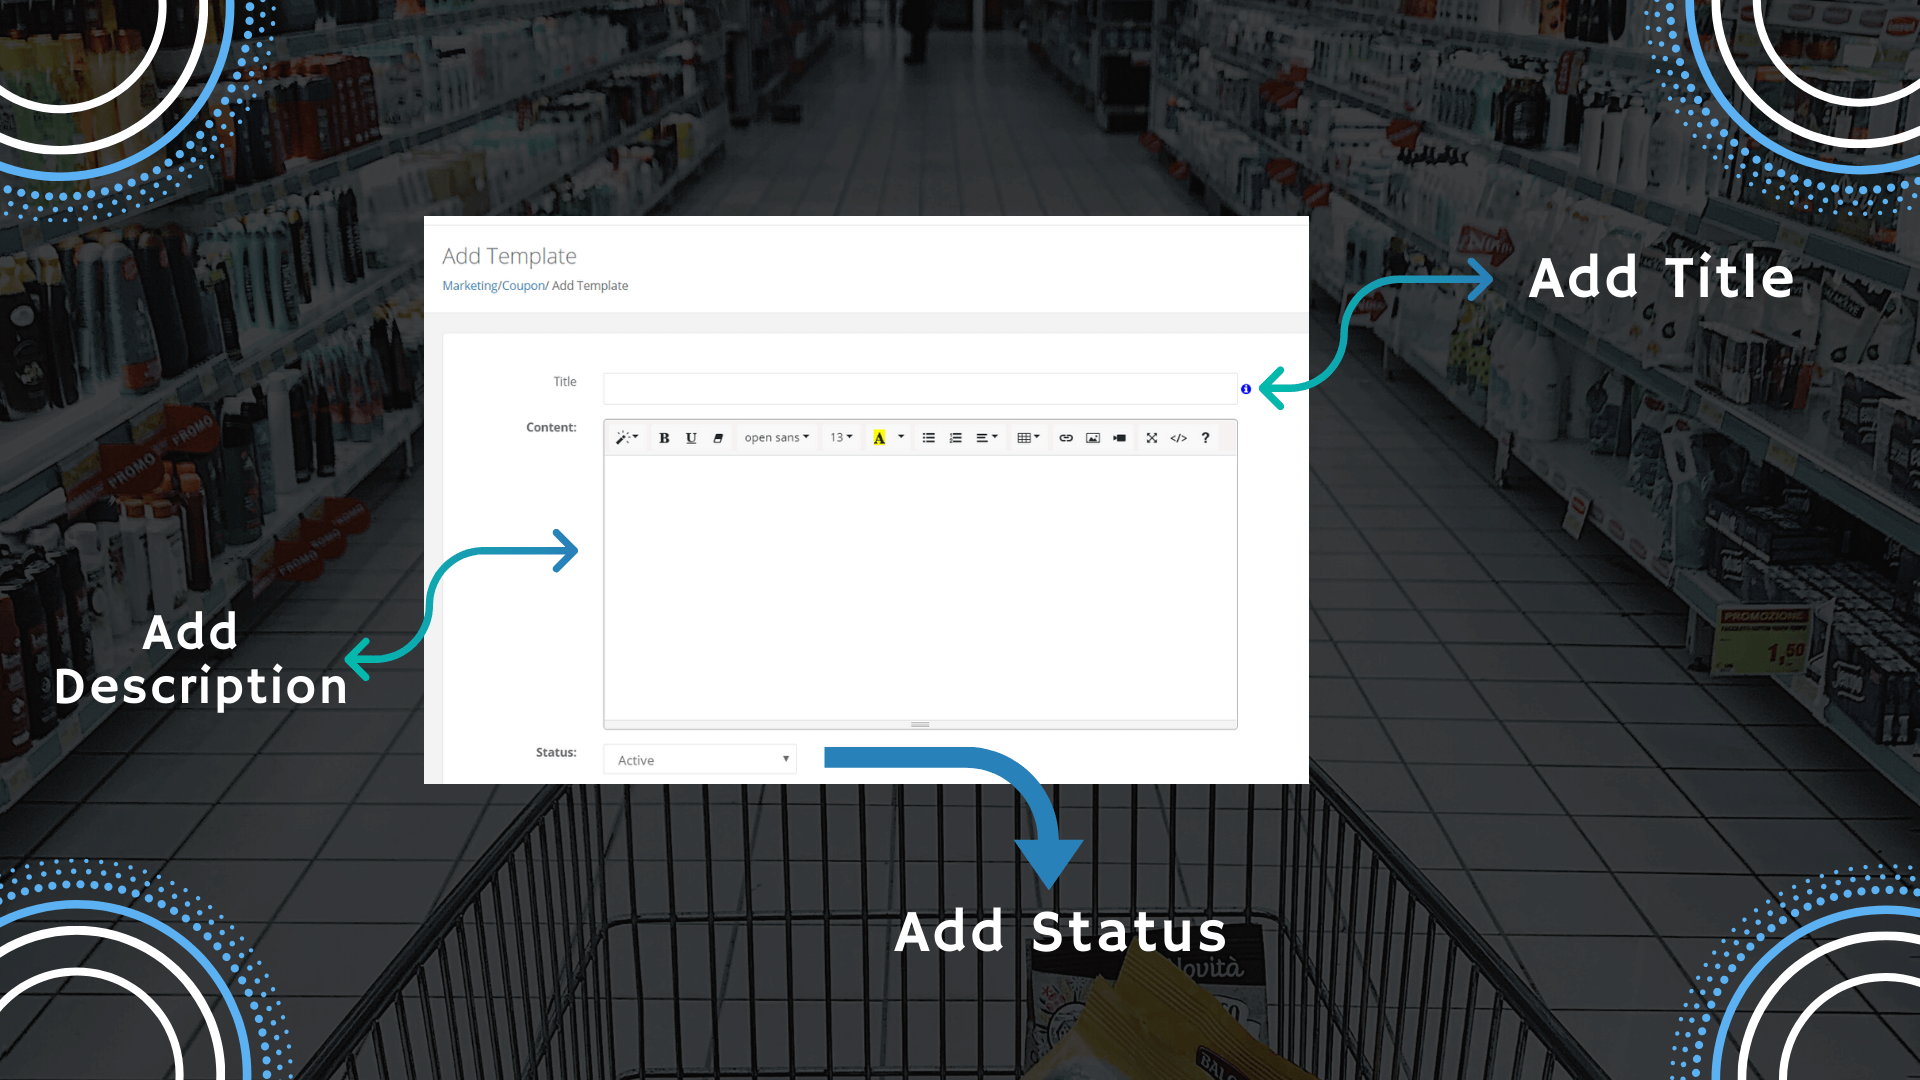
- To create a coupon template, you need to add a title and content for it.
- Choose a suitable title and add a description to it.
- The following template will however be valid only if its status is set to be active.
- You can add its status to active or disable in the next dropdown.
- To the right side of the section, you will see many items available.
- You need to click available items to insert them in the coupons template. This has made it easy to use variables directly in the content section. However, there is no necessity to use the items.
- You can use your custom texts even if you want. It is suggested to use the items as they will display the coupons-related information directly to the users.
- Each available item to the right holds its significance and its meaning can be understood by having a look at their name only.
- The content will be added with a click of items only. The template is now ready to use.
E. Free Shipping -
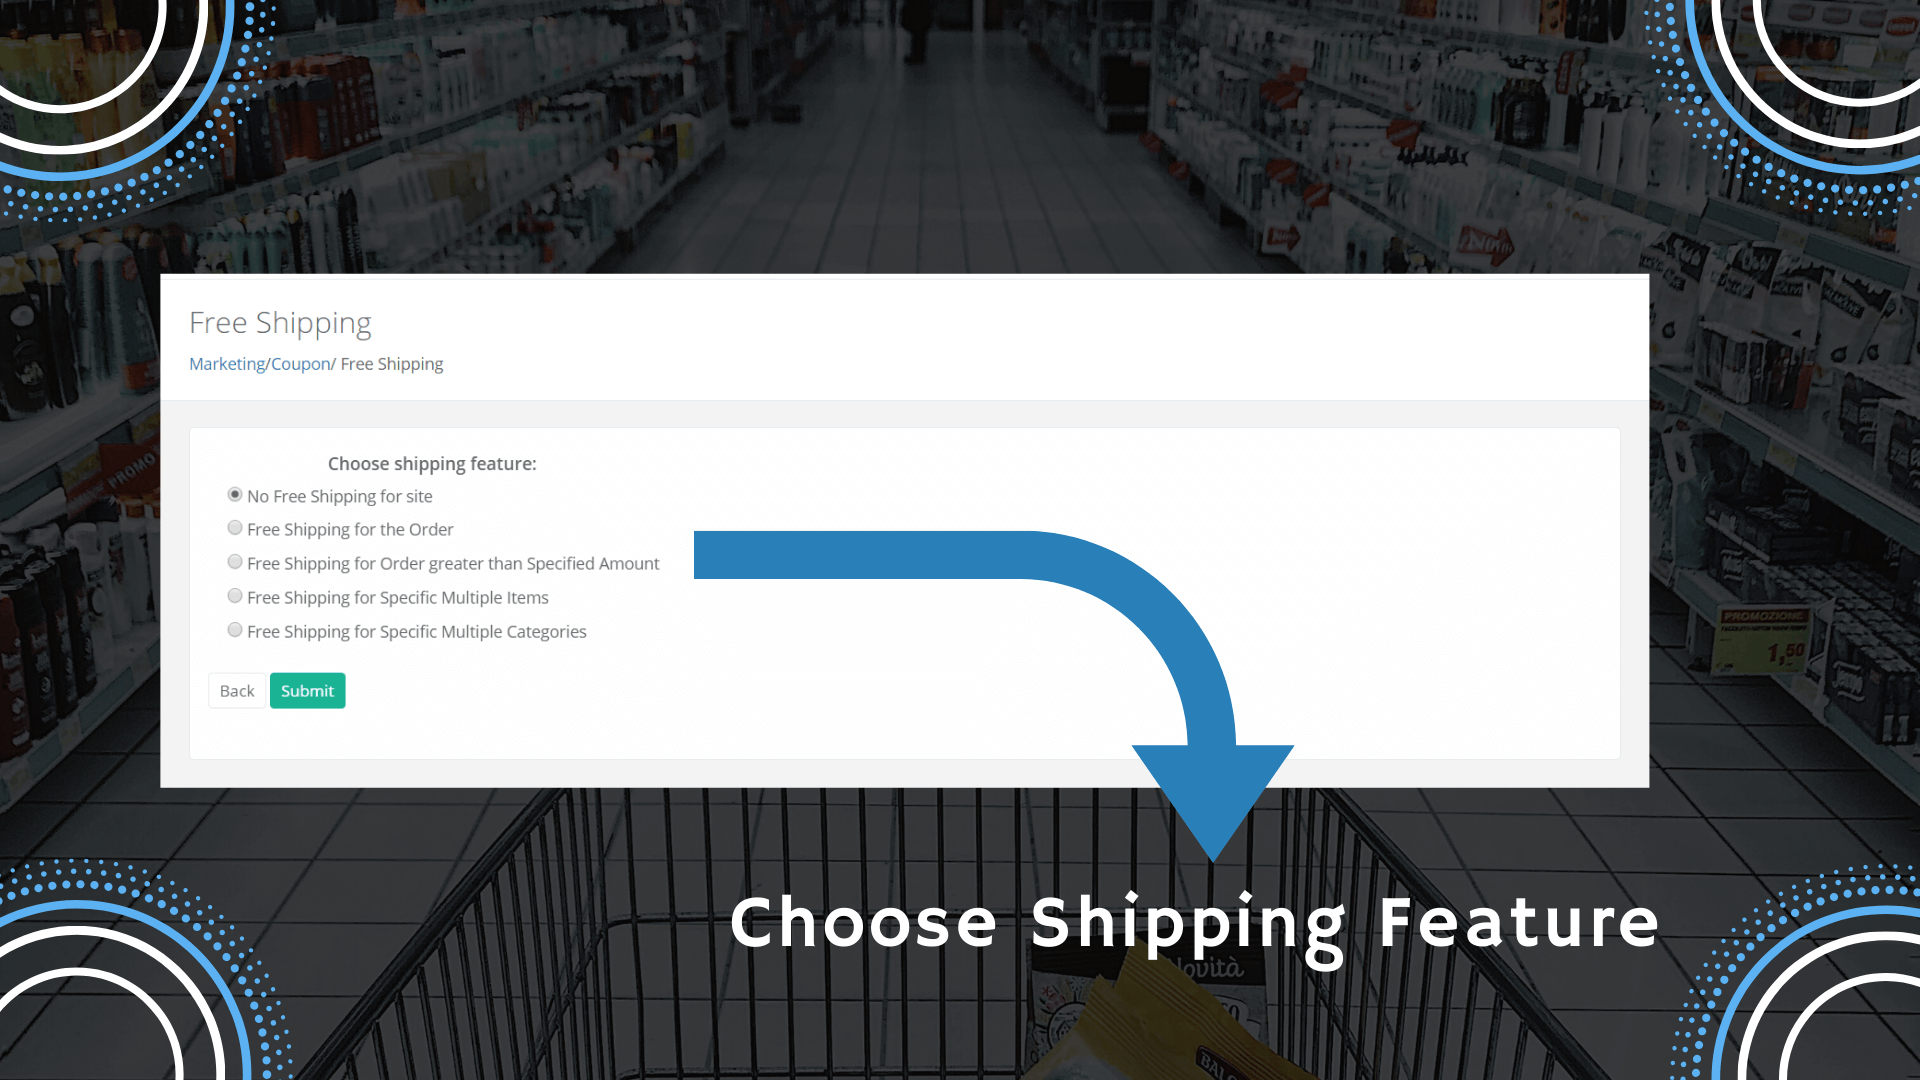
There is a free shipping tab under the coupons section which contains many options that you can set. In this section, you can choose any shipping features from the listed ones. You can’t select two or three features at the same time because of the radio buttons. It only allows you to choose one feature as desired and later submits it. There is no option to add new features in the free shipping tab. You just select one option and click submit to save it.
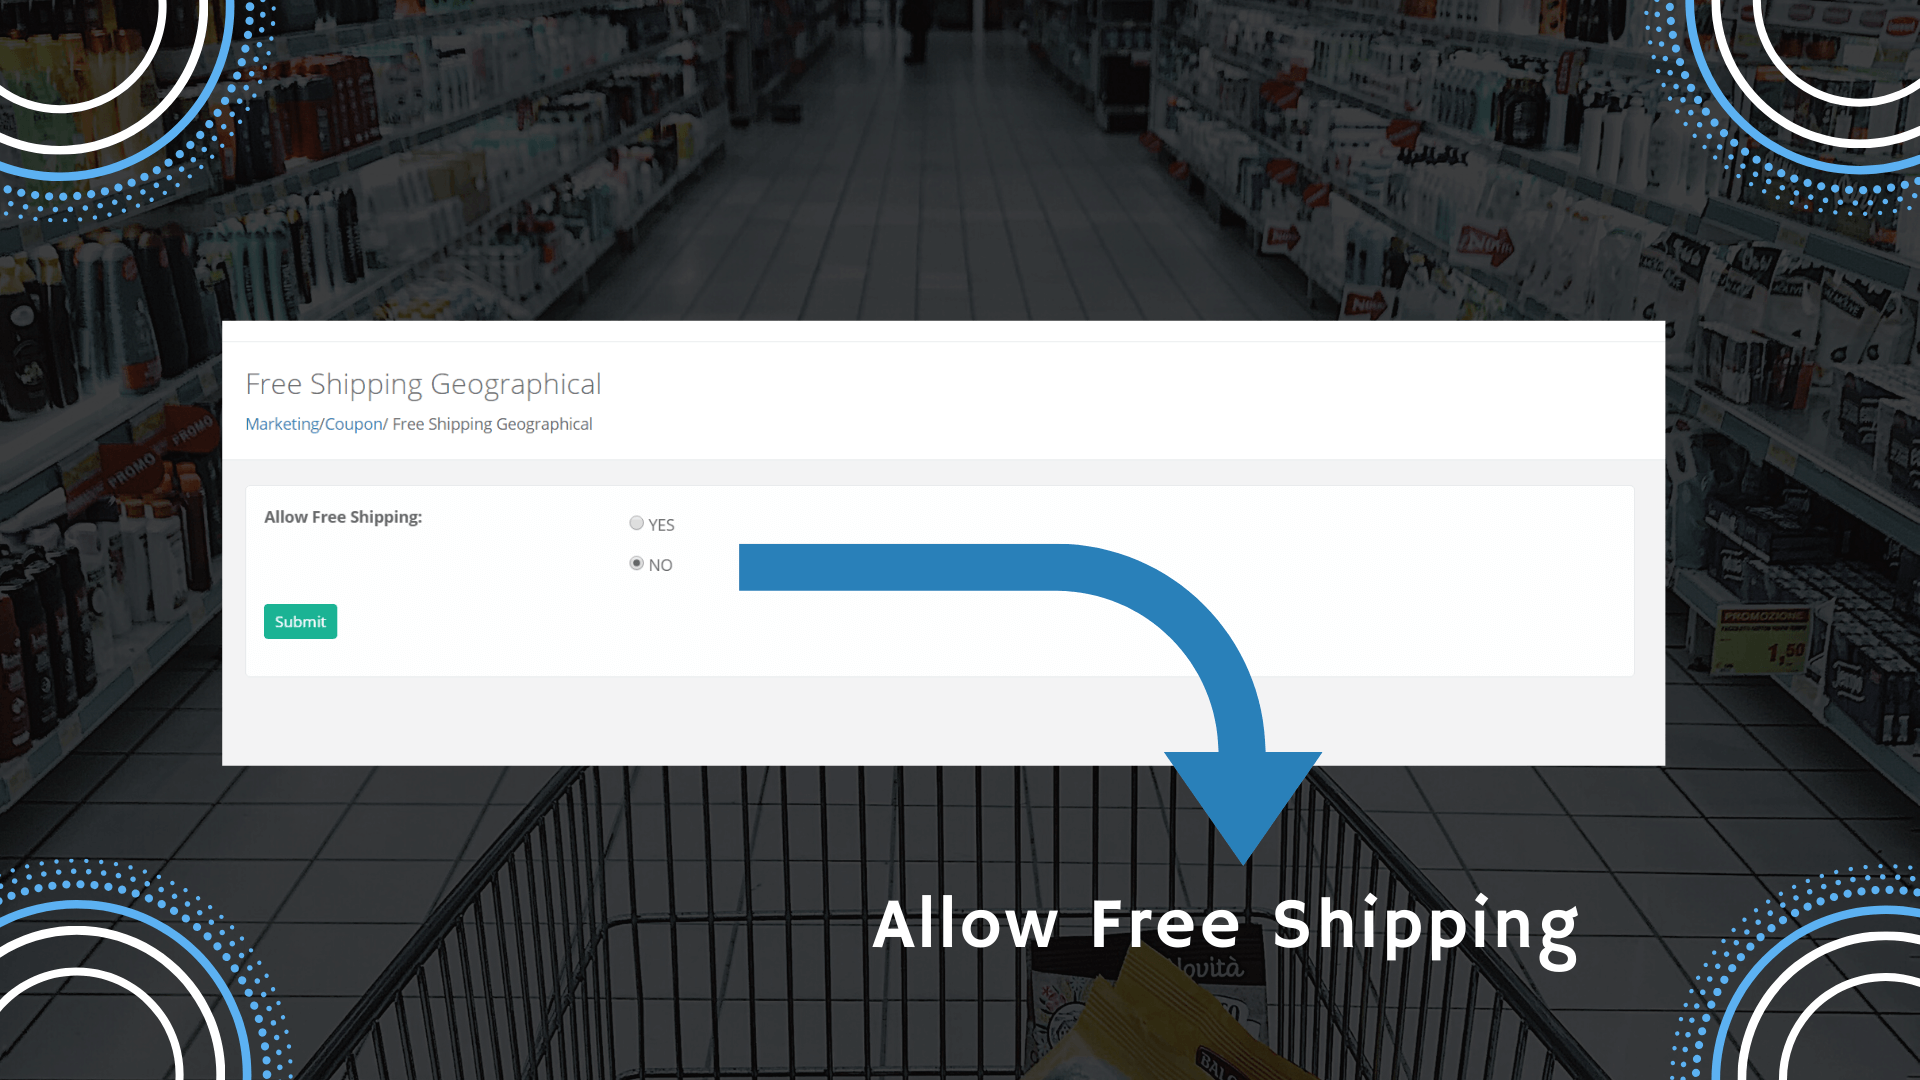
F. Free Shipping Geographical - This section lets you choose the geographical free shipping. You can either select yes or no based on the need. If you don’t wish to promote free shipping, choose no. Alternatively, mark yes as your option when you are clear about the idea of free shipping. There is only an option to set in this tab.
Manage Emails
This section is used to send and manage emails. The tab is divided into many subsections with each section holding its purpose.
A. Manage Newsletter - The newsletter is one section that lets customers receive all updates by subscribing to it. The tab contains a list of newsletters in the table structure.
The table consists of four columns containing “title”, “created at”, “last updated” and “action” sections. There is a search button at the top in which you can type anything and similar matches appear on the front. The previous and next buttons are available to expand your search and browse through different newsletters. Only 10 newsletters will show at a time but you can change it to display more rows. Change the option in the dropdown from 10 to any number.

The created newsletter can thus be modified here in the following steps.
- Open it and you will see all your newsletters stacked in one place.
- You can either drag your mouse to the particular newsletter or search it for modification.
- Both edit and delete operations can be performed by clicking either in the action column.
- Editing and deletion of the newsletter will be done using a pencil icon and cross icon.
- Besides this, there are other icons available to perform further actions.
- Hover over the icon and read an explanation for it.
- After you have done applying modifications, click save to submit it.
Besides modification, the button is available at the top in the green color to add a newsletter.
Let's study how to create a newsletter
- Click the plus sign on the button and a new screen will appear.
- Start by adding information in the newsletter.
- First, you need to mention the subject of the newsletter to give a brief about it.
- Choose a subject wisely in relevance to the content part.
- Then next is the description part. Few items are available to the right under the recipient info & miscellaneous tab.
- The admin can use the items directly by clicking on them.
- Last is the status tab which is used to activate or disable the current newsletter.
- Submit the information and your newsletter is now ready to use.
B. Product Template - The “products template” section contains a list of all templates in a table structure. It also has a button titled “Add new product template” which is used to create a new template. The newly created template is then shown in the table below.
A search box is also available at the top where the user is required to input values in relevance to the product template. Besides this, you can also customize your search by typing anything and correspondingly the results appear in front. The previous and next buttons are also available at the bottom to browse through different templates and make changes.

Let's first learn how to add a product template.
A new product template is created by adding the desired details in the fields below.
- Start by adding a title, and content.
- To make things easier, there are options available to the right that you can insert into the content directly.
- But before that, you should be well aware of each item and its purpose.
- Three tabs are there to the right of the template section namely: item info, recipient info, and miscellaneous.
- Clicking any tab opens up a list of items to be used in the content.
- To use an item under the info item, it needs to be clicked and data gets inserted in the content section.
- Similar is the case with the recipient’s info. This tab particularly contains details about the recipients.
- Recipient’s Info has two fields mainly: recipient’s address and recipient’s email.
- Then comes the miscellaneous section which only has the link to unsubscribe the email.
- Also, the content section below the title can be customized according to the need.
- The admin can also take care of the content responsiveness in this section.
- There are three small icons at the top of the content area. The first icon would be the desktop view, the second icon in the tab view, and the last one is the mobile view of the content.
- You can also customize the layout of the content here by using elements. There are several elements available like image, divider, text, button, etc. which can be used.
- Additionally, you could also divide the content into rows and columns and give it a more structured look. This is done by taking sections available in the content area.
Next, let’s discuss how to edit the created templates.
You should remember the template to modify it. Alternatively, you can search for it by providing suitable keywords in the text input box. The results will appear based upon values that you have provided. that should match some information in the templates. You can also use previous and next navigations to look at different templates and alter them.
The product template again can be edited in the same way as newsletters.
- Modify the title, content by choosing any of the desired actions.
- The date by which the template is designed is shown in the “created at” column.
- You will see a few icons in the Actions column. The usage of icons will depend upon what is required.
- Hover over the icon and you will see its explanation in one word. For example, the cross icon is used to delete a particular template. Editing is usually done using a pencil icon.
C. Products Article - The product article tab will show you a table containing all the articles. However, you can still add new to it. The section takes care of both adding and modifying articles. You have to use two options either edit the product articles or add a new one.
Read the instructions below to add an article.
- Click on the plus sign to add a new product article.
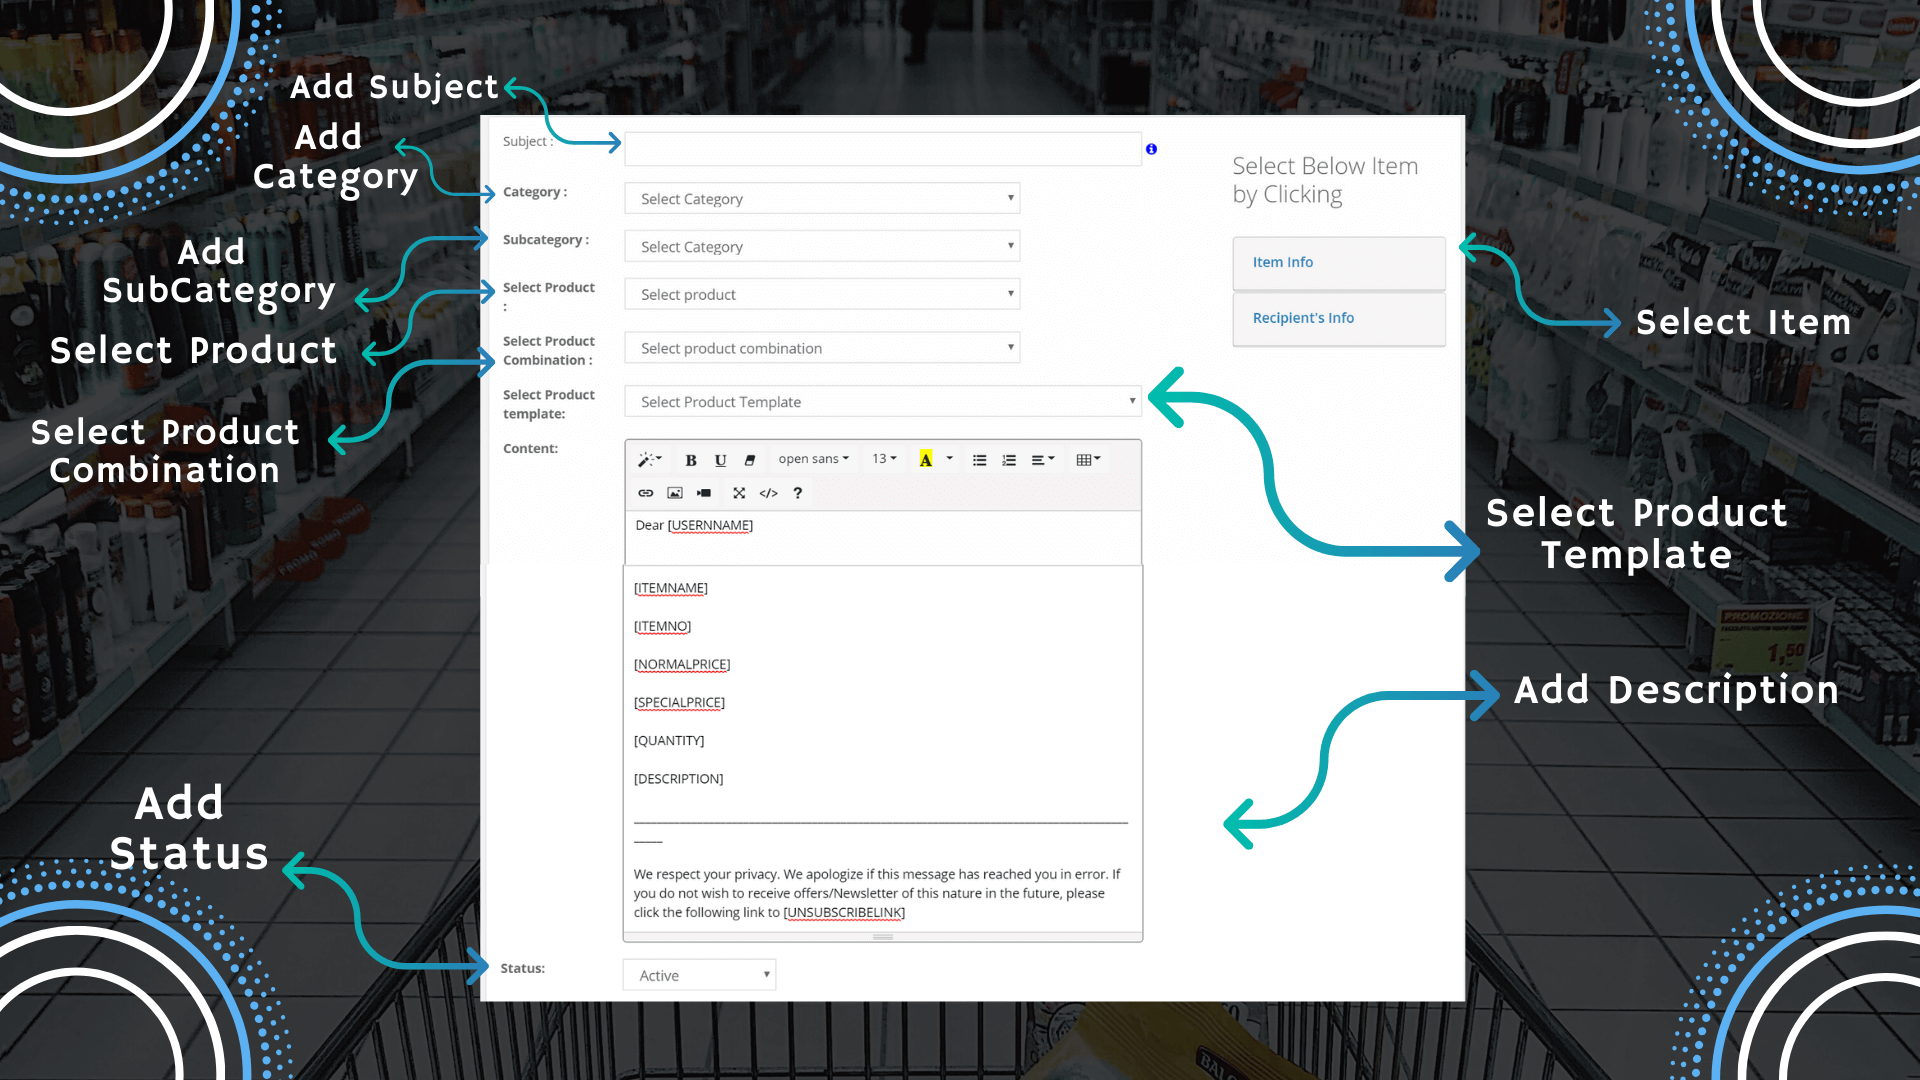
- Start step by step and enter the details of the product article.
- Add the subject of the product article.
- Select the desired category and subcategories from the dropdown.
- The categories and subcategories have already been created in the products section.
- Then next select the product and its combinations. You can choose multiple products in this section.
- Choose the desired product template from the dropdown to display things frontend.
- The content of the product article can be written using the information on the right side. For example, if you wish to insert item-related information to the content part, just click item info and add the desired.
- The same is the case with the recipient’s information; choose one to add it to the content.
- Lastly, set the status of the product article as either active or disabled.
The newly created article is now ready to use. This is how an article is added.
Editing an article is as simple as creating it.
- There are icons in the Actions column that will help to perform the editing operations.
- A search box is available at the top to find out the particular article.
- You can then make changes to the searched article.
- By default, it will show only 10 rows at a time but you can change it to the desired number by selecting options from the dropdown.
- Similarly, there is a next previous button placed at the bottom to search through different articles and make modifications.
D. Manage Subscriber - Subscribers are users who have certain access to the dashboard area. The admin decides which control is to be given to the subscriber.
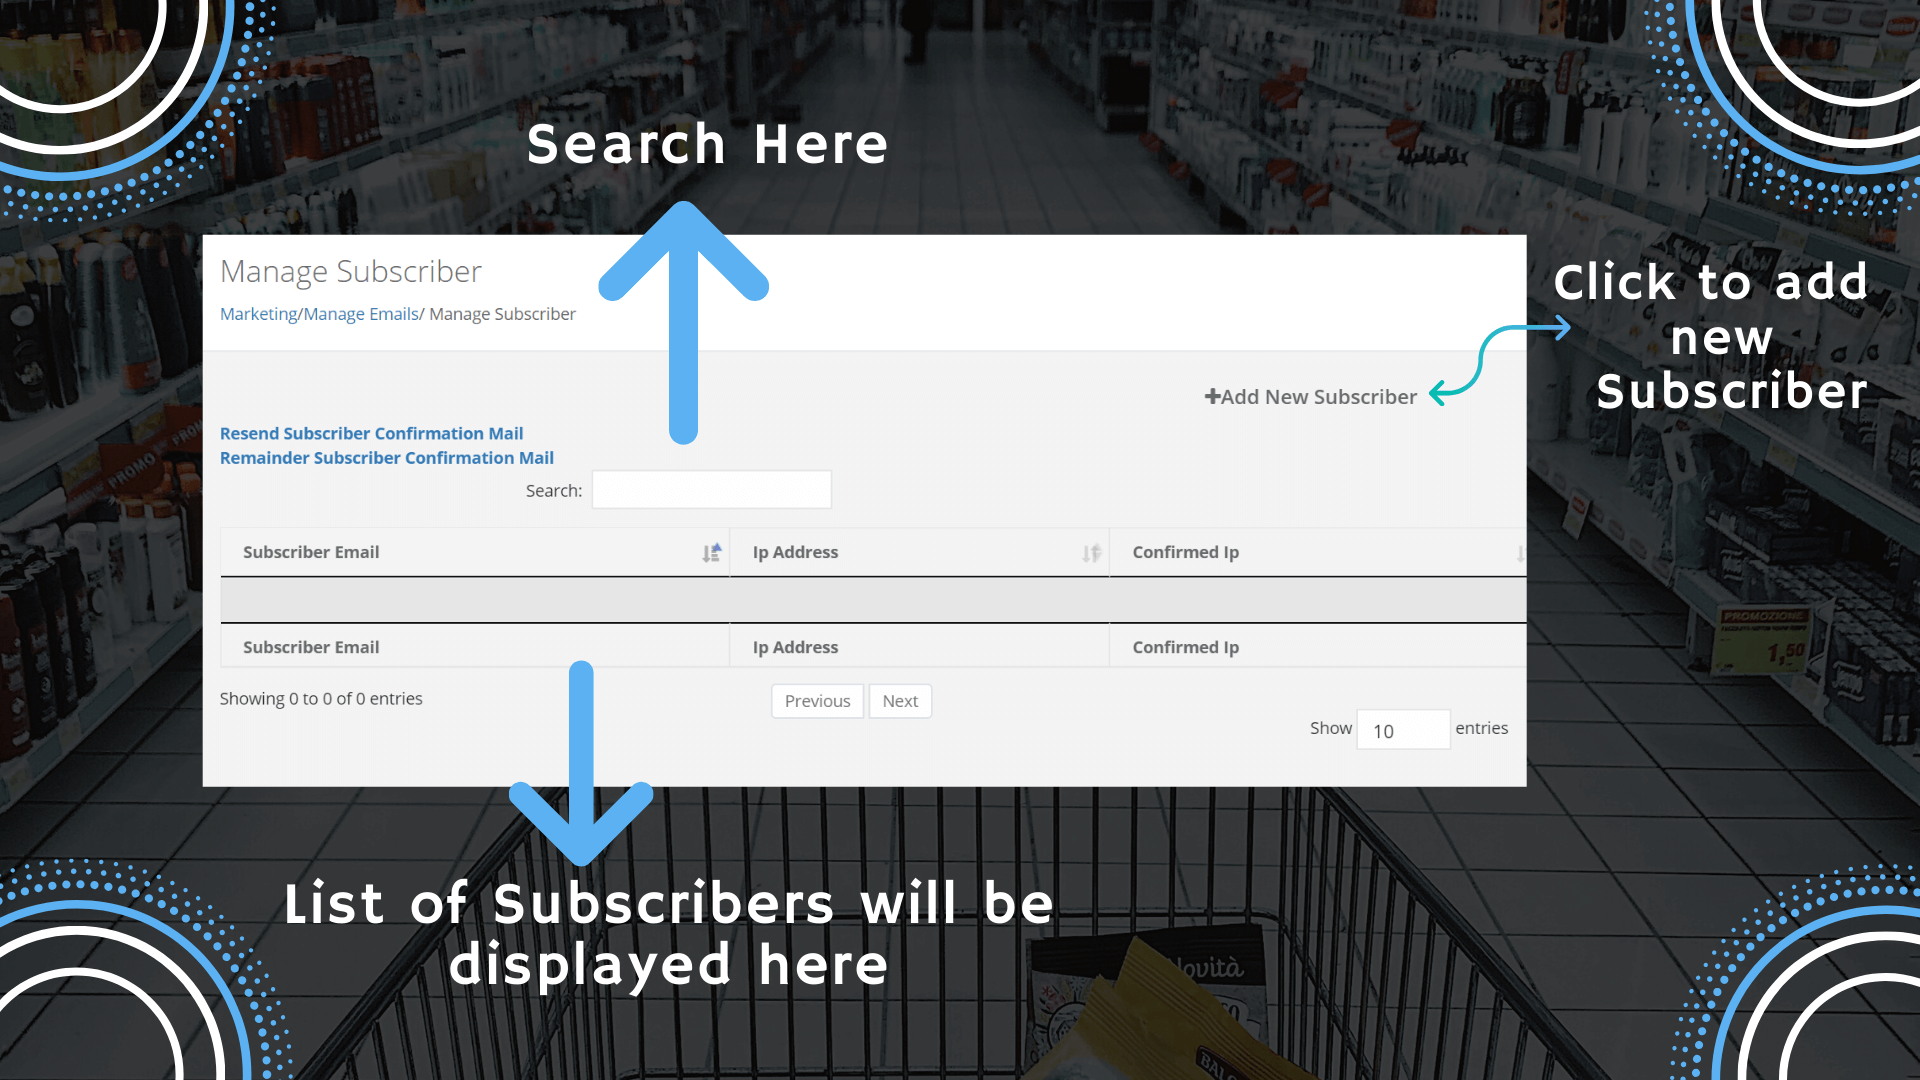
The “manage subscriber” section is there to handle a list of subscribers by using icons in the Actions column. The same tab allows you to add a new subscriber with the desired details.
A new subscriber is added by clicking on the plus icon on the green-colored button.
Click on add new subscriber and another popup screen appears. The process to create a new subscriber is quite simple. You just need to add an email ID and confirm whether it's yes or no for the newly created subscriber. Click create to add a subscriber and in case you change your mind, you can just close the tab and move back to the manage section.
Next, we move on to manage subscribers:
You will see all subscribers here in this section which can be modified if required. The table below has also listed down the confirmation date of the subscribers.
The top section of the subscriber tab contains two information links in blue color. Both the links perform different functionalities which is clear from the information written with them.
The first link “Resend Subscriber Confirmation Mail” will resend an email to the subscriber upon their confirmation. This will be helpful if the customer hasn’t received any email initially. This aids the communication process between the customer and the admin. This allows the admin to again reconnect with the customers through emails.
The next link "Remainder Subscriber Confirmation Mail” will send a remainder subscription confirmation email on click. Again, this email can be sent to the customers at any time.
Once you are done with these things, you can next proceed to make changes in the subscriber section. By default, you will see some information about all subscribers on the front. The changes can however be made using Action icons. For example, a cross-like icon is used to delete a subscriber and a pencil icon is there to edit subscribers.
A search icon is available at the top to find out the particular subscriber. The previous and next button is there at the bottom to scroll through different subscribers.
E. Subscriber Page - Subscriber has nothing much to do with the additional fields, only the content part is required. There are only two fields where you need to add content into.
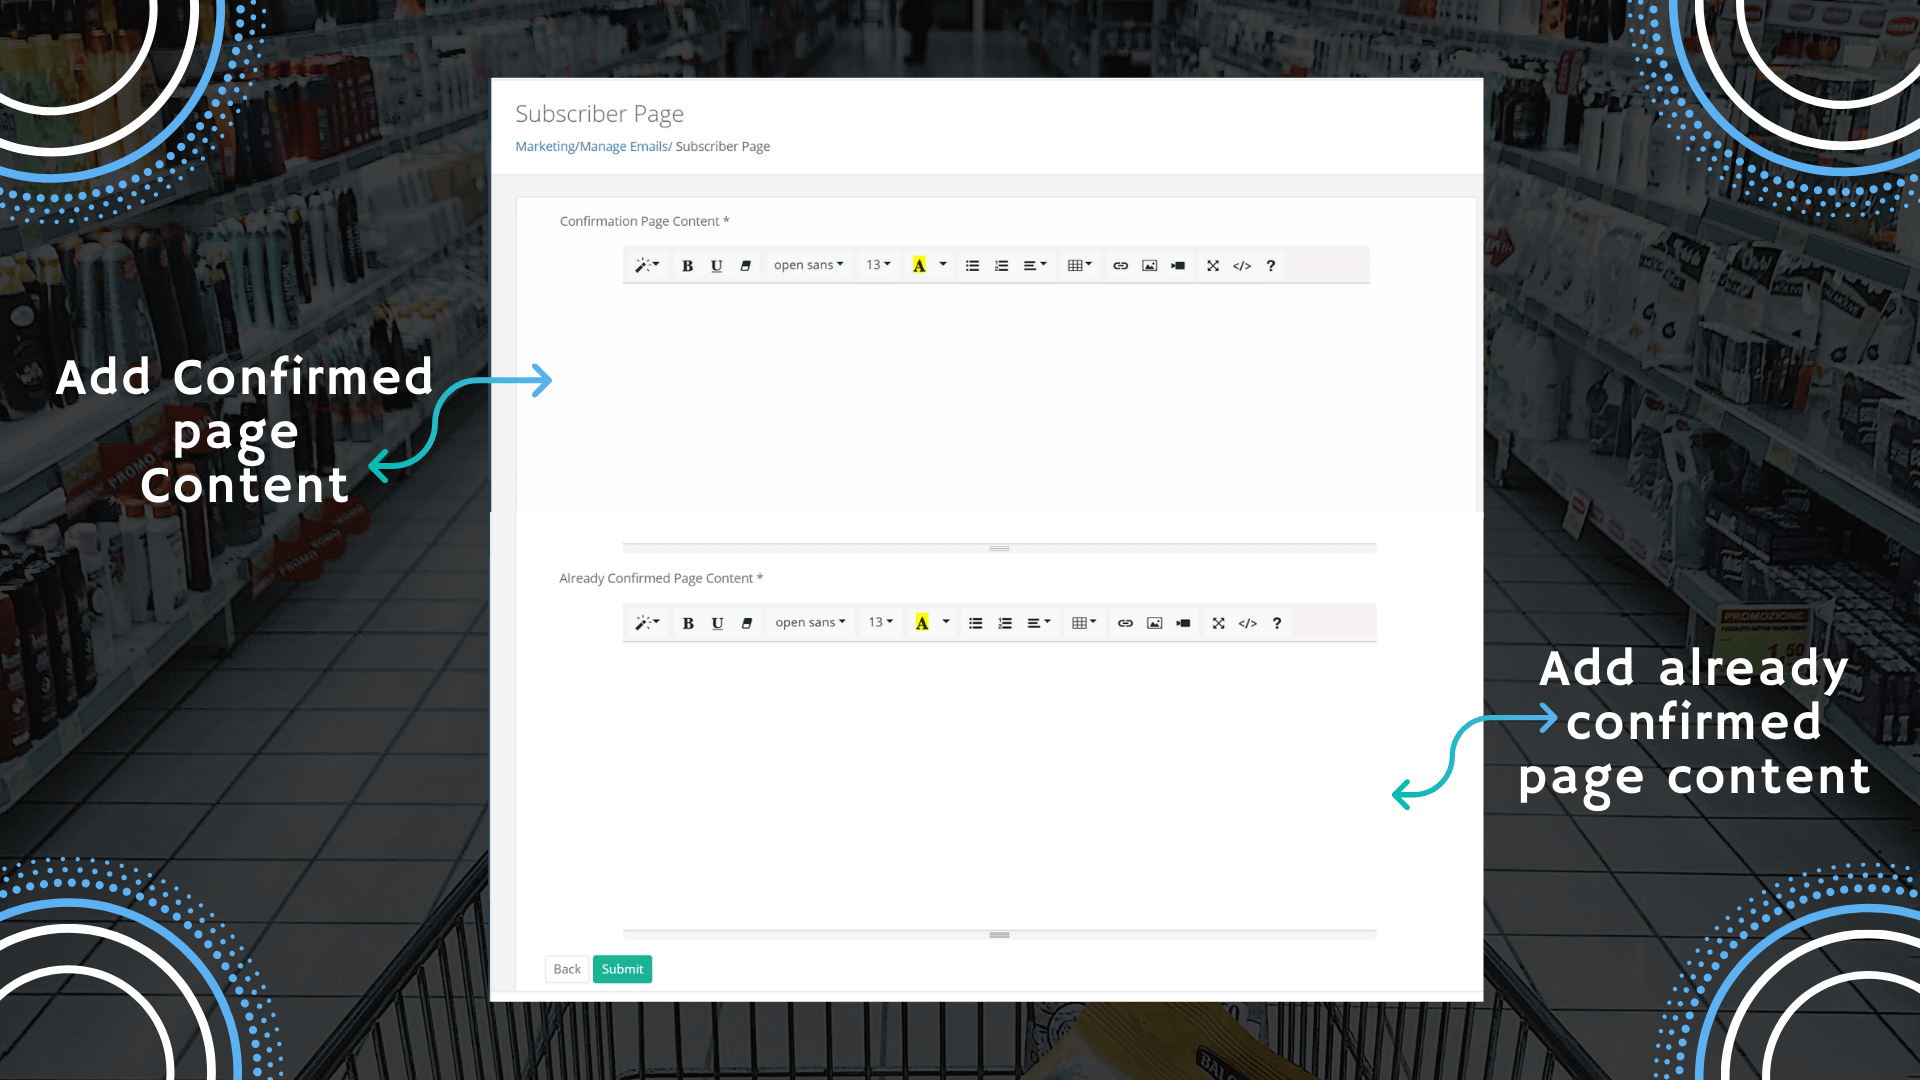
- Enter desired content in the confirmation and already confirmed page and press submit to save information.
- The added content will be visible on the website frontend.
If you don’t want to add any content to the subscriber page then click back to get to the previous page. This section doesn’t have many options and thus involves less time.
F. Upload Subscriber - This section allows you to upload all subscribers in one go. This is possible by uploading a file in CSV format created specifically for subscribers.
- Simply upload the CSV file and all the subscribers will get updated automatically.
- No extra coding knowledge is required to add subscribers. You can directly upload a list of subscribers in this section.
- The file to be uploaded should be in CSV format and well designed.
Click on a link in the note below to download a sample CSV file. It is very important to take note that the file you upload must contain proper syntax and column names. This is to avoid errors while uploading.
G. Email Templates - This section lets you manage templates for many automated and customized emails. You can drag to the previous or next button to view all email templates. If you wish to make changes in a template, click edit in actions corresponding to the particular template.
- Modify the template by altering the title, content, and user subject to submit it.
- Select desired recipient info from the right side to insert it into the content.
You will get all types of email templates here from user registration to order confirmation, to newsletter & subscriptions, etc. Besides this, it lets you choose templates that have been created and customized earlier. You can use the pagination below to move back and forward to the templates listed on pages.
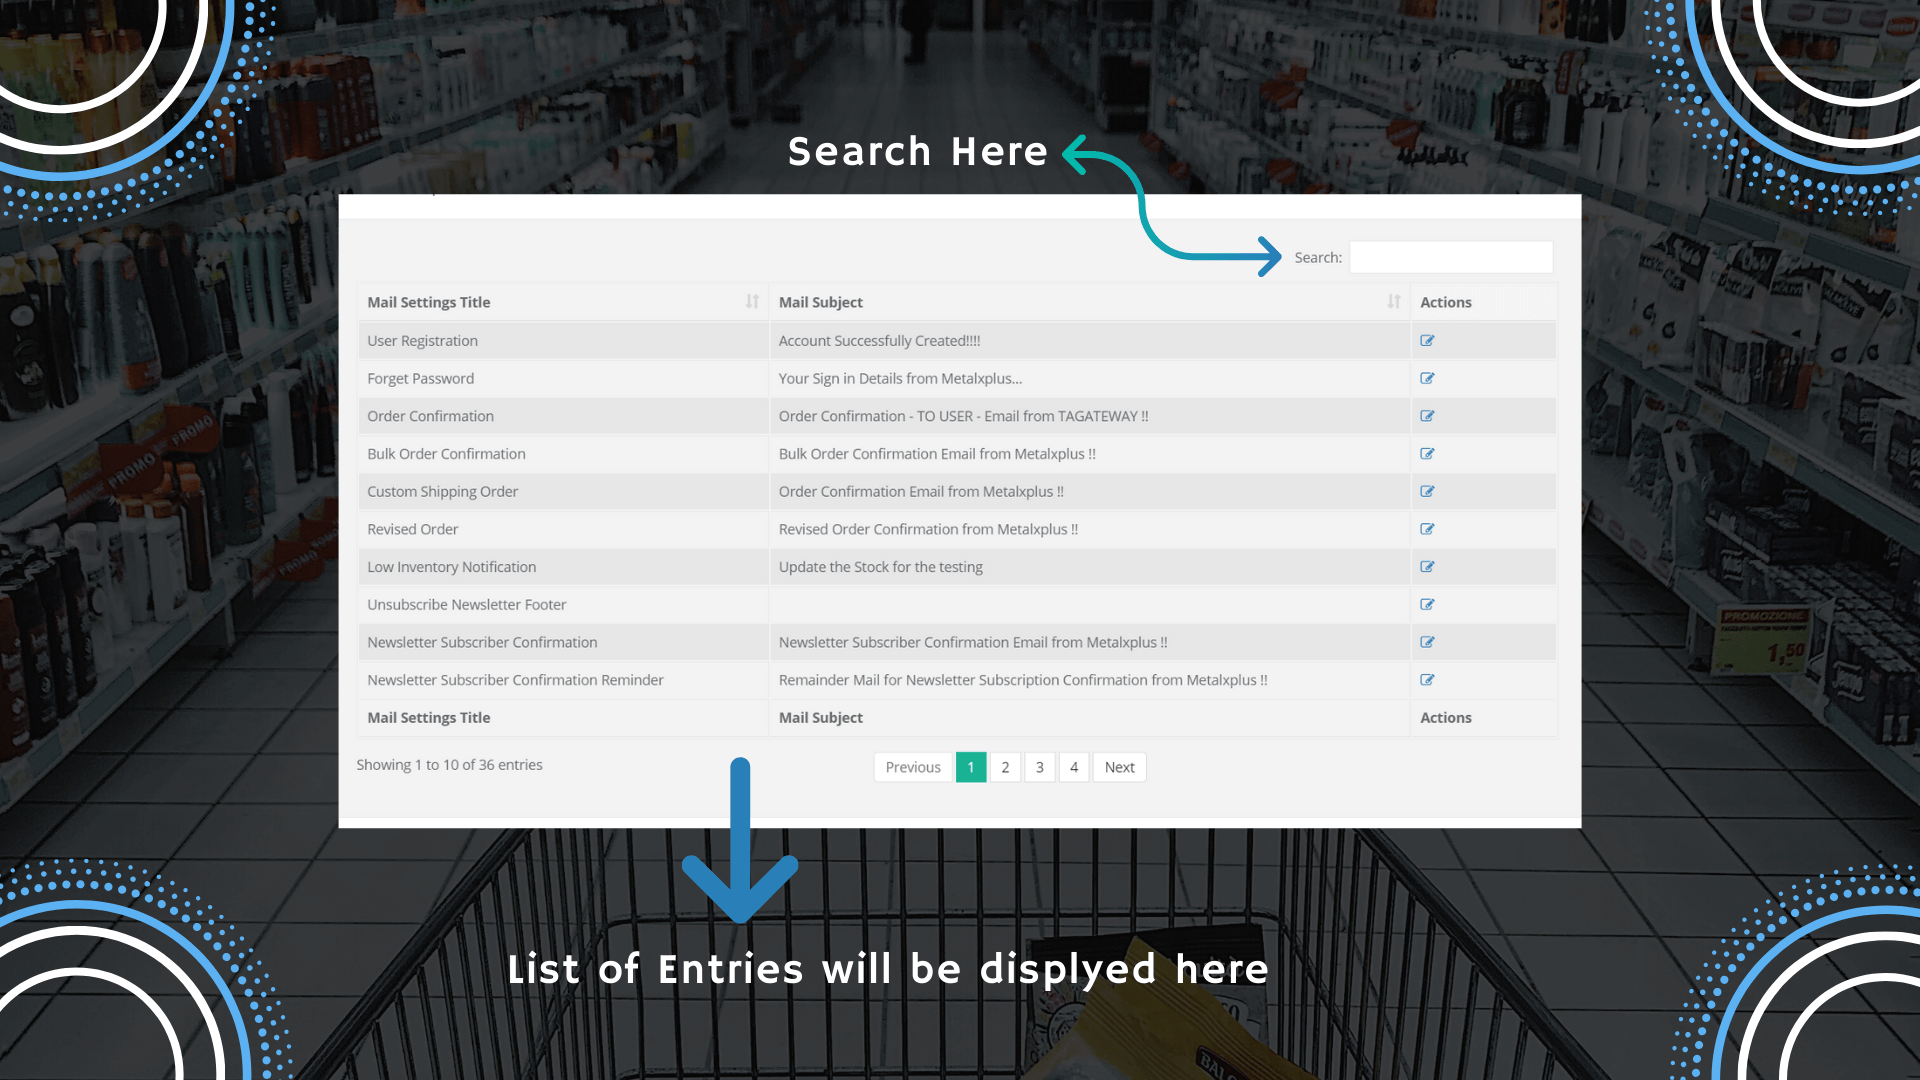
By default, you can only view 10 templates at a time but it can be changed from 10 to any other number by selecting an option from the dropdown.
- Make changes in the desired template using the edit icon in the Actions column
- Submit it to save information.
- A search box is also available at the top to browse through email templates.
- Type relevant information and search results appear in front.
- You can change the desired field in the templates and test them to see if it comes to email.
H. Mail Configuration - This section contains the configuration settings of the email. You can set the name from whom the email is sent to the customers.
- Add admin details followed by “reply to” information.
- Next, you need to insert port number, server details, user details, etc. to configure email.
- Choose the desired method from the mail transport system.
- It is very important to choose the mail transport method correctly, which is supported by the server and should be able to handle emails.
- After you have configured the mails, you can test the connection once by sending an email.
The tab has the advantage as it only contains a few configuration settings and also lets you test connection at the same time. You can even set the CC option in the email.
Configure options here and save them.
Manage SMS
This is the section where all the SMS are handled. You can design templates to send SMS to the customers. The created templates can again be modified using icons in the Actions column. The admin can view all SMS records in one place. You can or add or delete the SMS article and manage its configuration in this section.
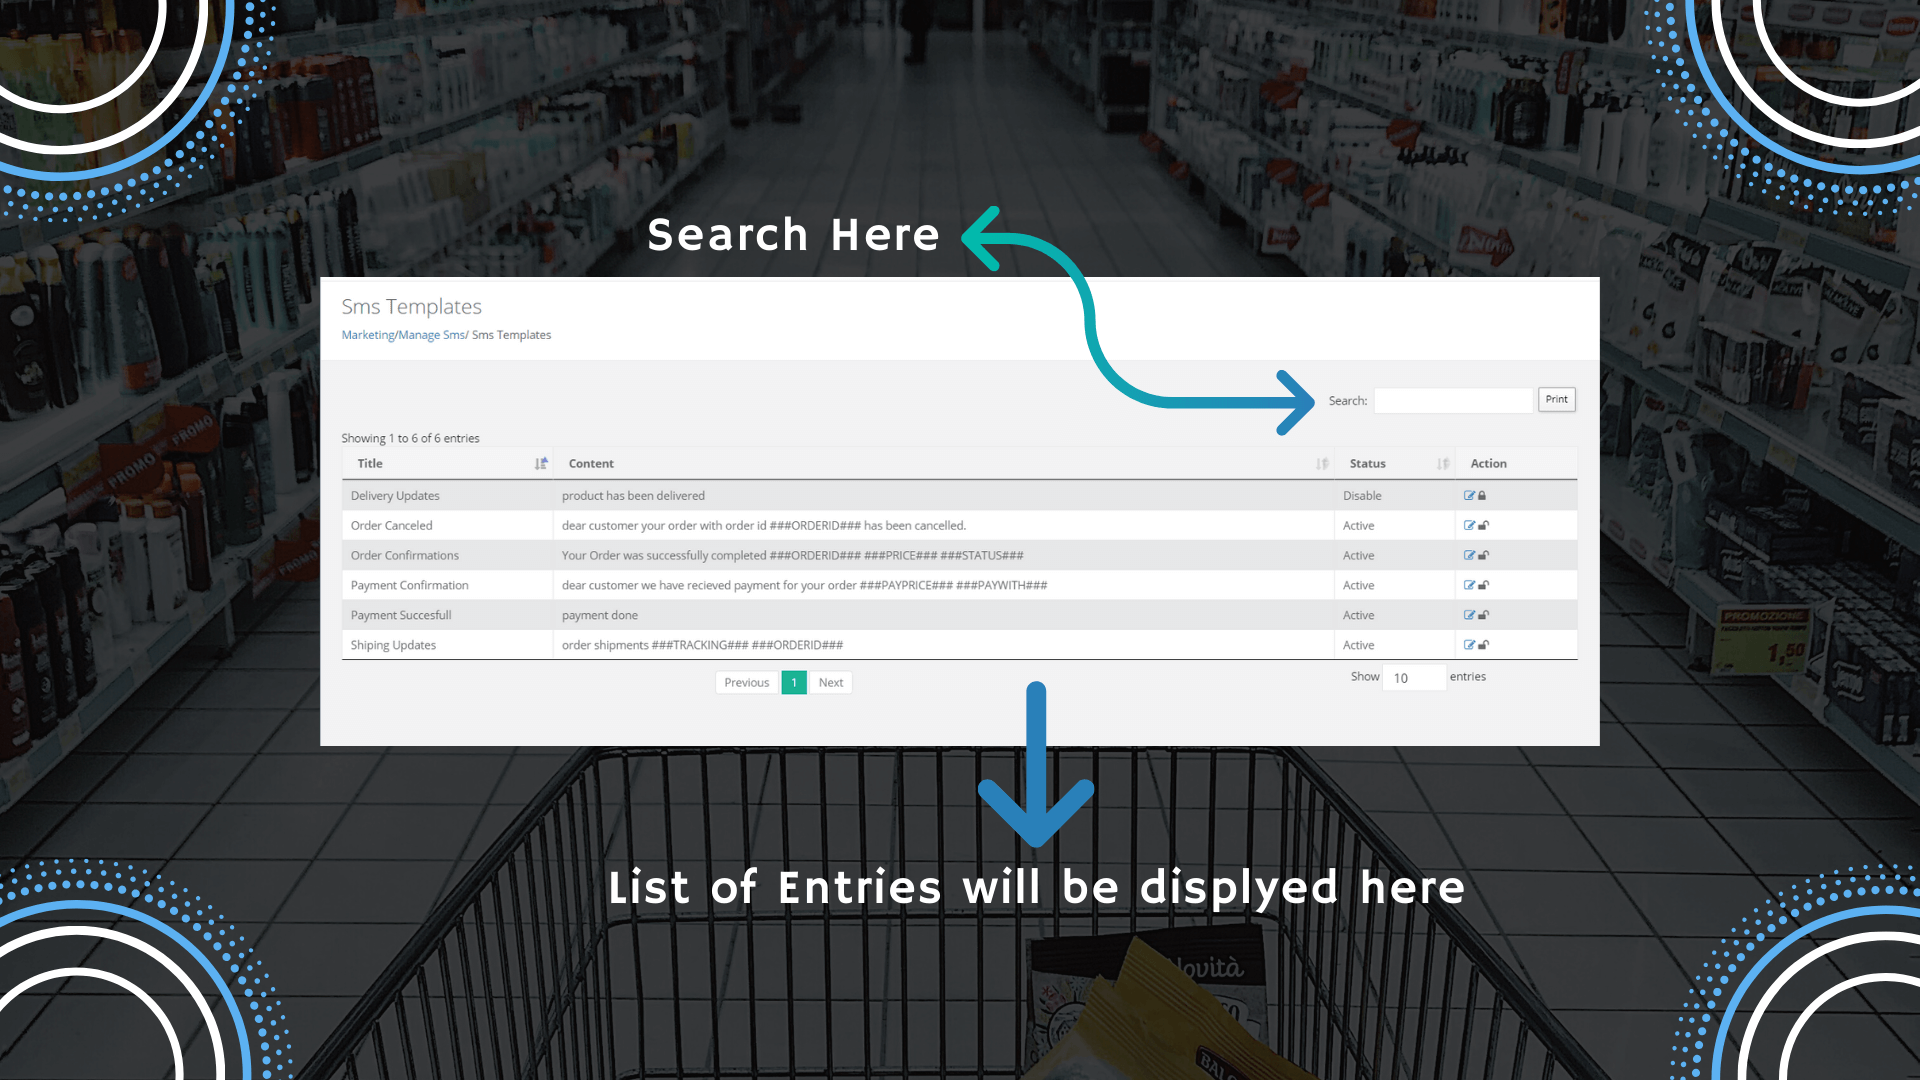
A. SMS Templates - The tab shows you a list of templates that can be modified according to the need. It even allows you to print a particular template and review it later.
The table is divided into four columns containing: title, content, status, and action. You can use controlled navigation previous and next buttons to search through different templates and make changes to them. Each template has its status set to either active or disabled.
- To alter a particular SMS template, click edit in the action section.
- Write the title and message for the SMS.
- Enter the message in a proper format.
- You can also choose items written below to add them to the SMS message.
- The items below are there to add either order-related information such as user ID, price, etc.
- Select status as active or disabled to make the SMS template work.
- You can set the SMS templates for delivery updates, order cancellation and confirmation, payment updates, and shipping information.
- Put the desired information in the templates.
- After adding all information, click save to submit data.
- The preview button is also available at the bottom to view changes saved in the templates.
- In case you change your mind about not making any changes, click the back button to revert to the previous tab.
B. SMS Records - This section gives you a complete view of the SMS sent to the customers, this is why the tab is termed as SMS records. You can keep track of all the records in the table format.
Get user's information such as contact details by clicking on a particular record. You can even have the facility to print an SMS record. It lets you publish a record using the print command. Search a record and print it on click. There is a search field at the top to find out the particular record.
By default, you can only view 10 records at a time. However, it can be changed to more number of records. This is done by selecting the option in the dropdown. Then there is a previous and next button to search you through different SMS records.
- The list also includes the contact details of the customers who have received messages.
- Along with this, there are details of the user, message, current status, etc.
- The reference number is also there which is different for every record.
- If no records are found, then it will show you an empty table with no content.
C. Add SMS Articles - The above tab only allows you to modify SMS articles. You can create an SMS article in this section.
- Add suitable information in the fields below.
- Type title and message of the SMS article.
- Again you can use the available items below to add them to the content section.
- Lastly, choose status as active or disabled.
- Click save to finish adding articles.
The section doesn’t contain too many fields to add information. The message part contains the subject of the mail that is to be sent to the customers. So, write suitable content that is easy to understand for the end-users. Similarly, you need to select the status of the SMS article which will decide whether the current article is in use or not.
D. SMS Articles - You may like to print SMS articles to review them. To do so, search an article first and print it by clicking.
This tab will show you a list of SMS articles that can be either modified or print using different commands. All the articles are listed in a table format.
- The icons in the Action column will help to make modifications in the particular article.
- You can either edit or delete an article using different icons. A pencil-like icon helps to make changes in an article. On the other hand, a cross icon is used to delete it.
A search button is also available at the top that lets you select an article and even print it. A print command is also there to the immediate right of the search field. It requires you to choose the article first and then clicking the print button to download the article.
At first, it will show you 10 SMS entries only. You can view all by selecting the next or previous button. Alternatively, you can change the number of entries to the desired number. However, for that, you need to change the number from 10 to any other based upon the options in the dropdown.
E. SMS API - Here you can set AWS settings. The tab contains only minimal fields that have the least to do with the content part.
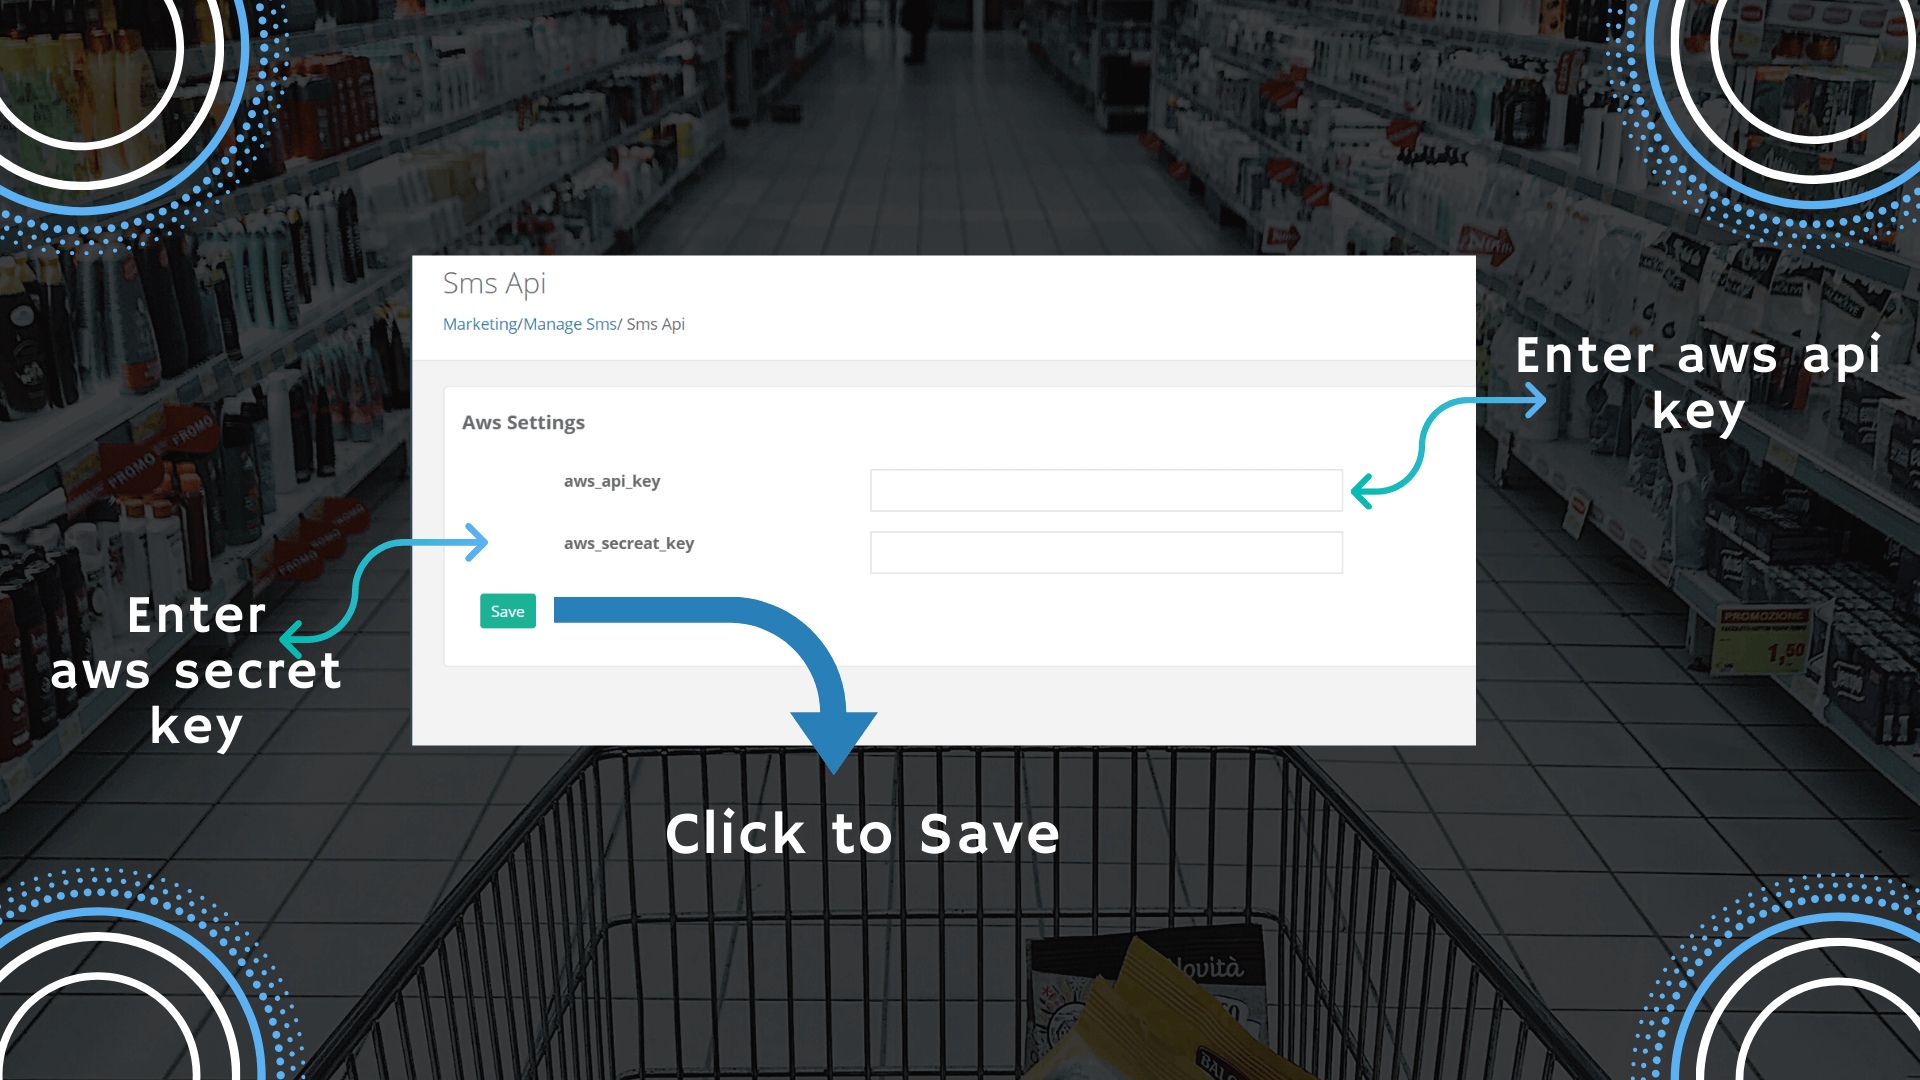
- The section only allows you to configure API settings.
- It works like a third-party plugin that configures the SMS structure.
- Enter the API key and secret key to make the SMS work. You can get the keys from the AWS dashboard. Login to your account and get keys information. Insert it here and click save.
F. SMS Configuration - You will see here a list of radio buttons that you can choose to configure SMS settings.
- Select whether to enable or disable SMS services on purchase.
- Further, choose to enable subscription services.
- Paid or unpaid message delivery options are also available.
- You can also decide to enable SMS delivery on shipping and cancellation.
The section also lets you define offer notifications which you can set by selecting yes or no. All the fields listed here will have two options: yes or no. Choose the desired option for each field and save it to store information.