CUSTOMERS
The customers tab is there to perform any customer related activity. The section allows admin to add, delete or edit customers by modifying certain details. It is also even easy to define different roles and permissions for your customers that offer them required access to the website.
- You can choose from the number of permissions available and then assign it to the customers. Permissions can be set considering the requirements.
- Also, it is a perfect place to make a differentiation between the types of customers at the initial step. The admin just have to make a selection from the dropdown.
- The dropdown contains different types of customer roles. Choose any for a particular customer.
- There is also an option to generate a password automatically. This is helpful specially if you don’t wish to type a password on your own.
- It starts by adding personal information of the customers including their name, email, phone number, etc.
- Set a password and confirm it in the next section.
- This is then followed by adding the customer’s shipping and billing address.
- Similarly, you will put up address related information in the corresponding fields. All the information saved in the fields will get stored to be used for future perspectives.
Profile Information - This tab contains information that is personal to the customers such as name, email, contact details, password, country code, etc.
- You can even mention the discount percentage that is valid for the customer while purchasing.
- You can add whatever details you want to be saved in the customer’s profile.
The customer may be holding a business account and hence you could get access to their websites whose URL will be provided here. Mention the company name along with the website to have a better understanding of the business. Later you can even search businesses on Google to make sure it exists. However, it is optional to add this information.
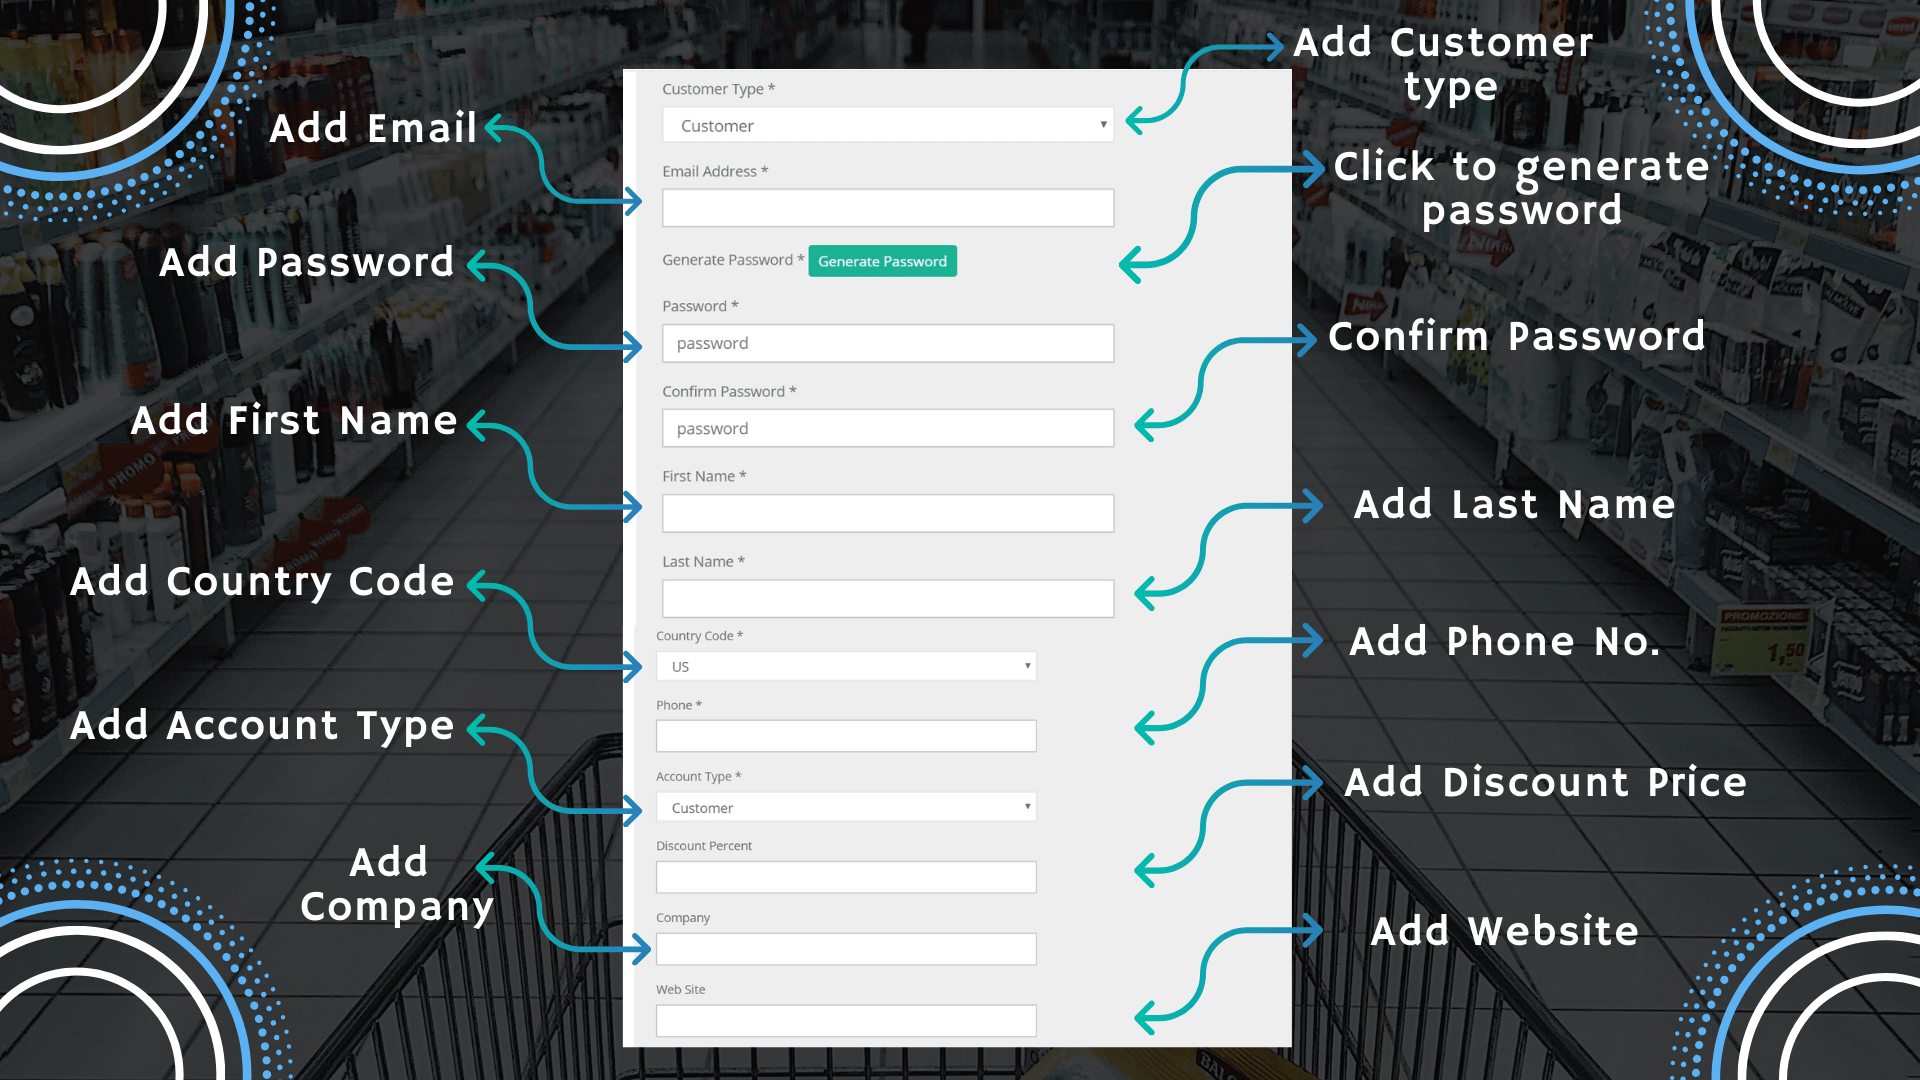
- The first field is the type of customer. There are three types of customers here: regular customers, bulk buyers, and dealers. It is important to differentiate between the types of customers.
- The price of the product would be different for a varied range of customers. For example, a dealer will get to purchase the product at comparatively lower prices than other customers.
- Now it’s time to create an identity of the users by using email and password field.
- There are two ways to create a password field. Either click on “Generate password” that will automatically create a password for the user or you can set a password on your own. Confirm password typed in the above field just to make sure that it matches.
- Other fields are first name, last name of the user.
- The country code accepts input for the US and Canada only. Choose one from the dropdown.
- Next enter the phone number of the user. Contact details of the user are important to send notifications related to the purchase, maybe delivery information.
The account type specifies whether the user has the permissions to add or make changes in the dashboard. Selecting a customer type other than the admin will not allow users to access the dashboard area. A customer is only capable to buy products. An admin, on the other hand, can do anything on the dashboard. You can also specify the discount percentage for a particular user.
- The last two fields, company and web details of the user are optional. You can either add or avoid entering any details to the field.
- Click next to enter the billing and shipping address of the user.
You can’t proceed to add the address in the fields without finishing the first step. Creating a customer first is thus an essential step.
Billing Address - The billing address is the address where the products will get delivered after processing the order. The bill will be issued on the address entered by either the user or admin.
It is important to correctly fill up this information to deliver the products at the right place. This in turn will also avoid the mess that will contain missing information.
Also, never forget to add the contact details along with the address to reach out to the customers. Enter all the required details in the billing address to avoid the dispatch going to the wrong address. In such a case, a product could be lost and customer has to pay for it. This further creates a wrong impression.
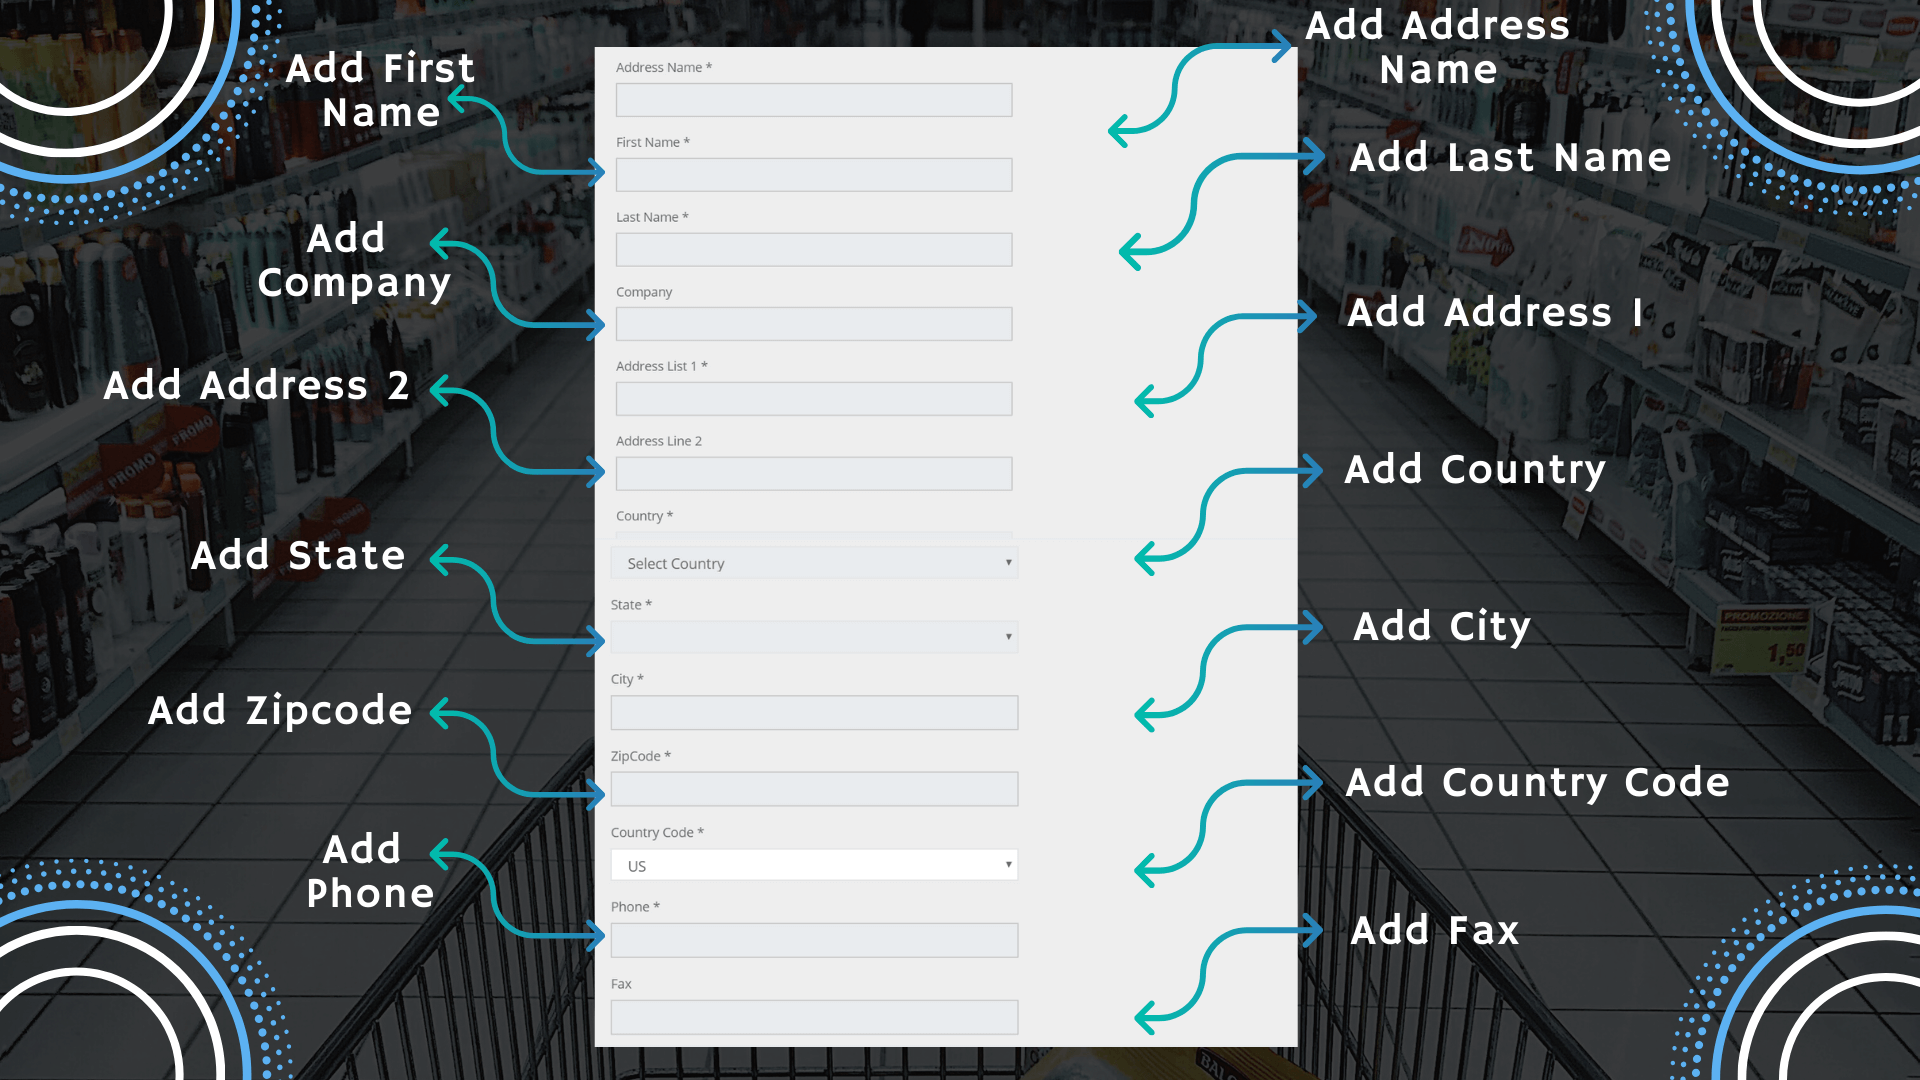
The tab is available in “Add Customers” and allows you to add details in the fields provided below.
- Billing Address will be added by the users. However, admin can still make changes to the same.
- Tick mark the “Edit billing address” checkbox and it will allow you to make changes as required.
- The fields in the Billing address tab include address name, first name, last name, company, etc.
- The first, last name and company field will get populated automatically from the previous step.
- Next is the option to change the address list specified by the users and replace it with the correct address.
- The admin may like to modify fields according to the need. The country can be changed here by selecting the desired option from the dropdown. It can be altered from time to time either on the front end or at the dashboard area by the admin.
- The state field allows you to select a state lying in a particular country. The selection of country code was also there in the customer creation tab. However, you can also change your option here in the billing address field.
- The city field allows users to enter the city.
- Similarly, the user has the option to enter Zip code, which can be altered later.
- Again, the last two fields are phone number and fax number of the users. You can leave these fields empty if you don’t wish to make any changes here, else make desired modifications.
Shipping Address - Just like the billing address, the shipping address can be added in the same way. It is important to note that the shipping address can vary from the billing address.
You may have set the billing address previously in your profile section. However this time may like to ship it on the different addresses besides the address that is in the profile. In such a case, you can enter a separate shipping address.
Also, there is a chance that the user likes to receive billing at the mentioned billing address and delivery at a different address. The shipping address comes to rescue. Add suitable information to the fields provided below and save it.
The shipping address can be entered by adding the required details starting from the name, email, address fields, city, country, telephone no., etc.
The fields in the shipping address are the same as those found in the billing address. However, shipping details can be different from the billing address for a particular user as discussed above also. There should be no scope of confusion between these two types of addresses.
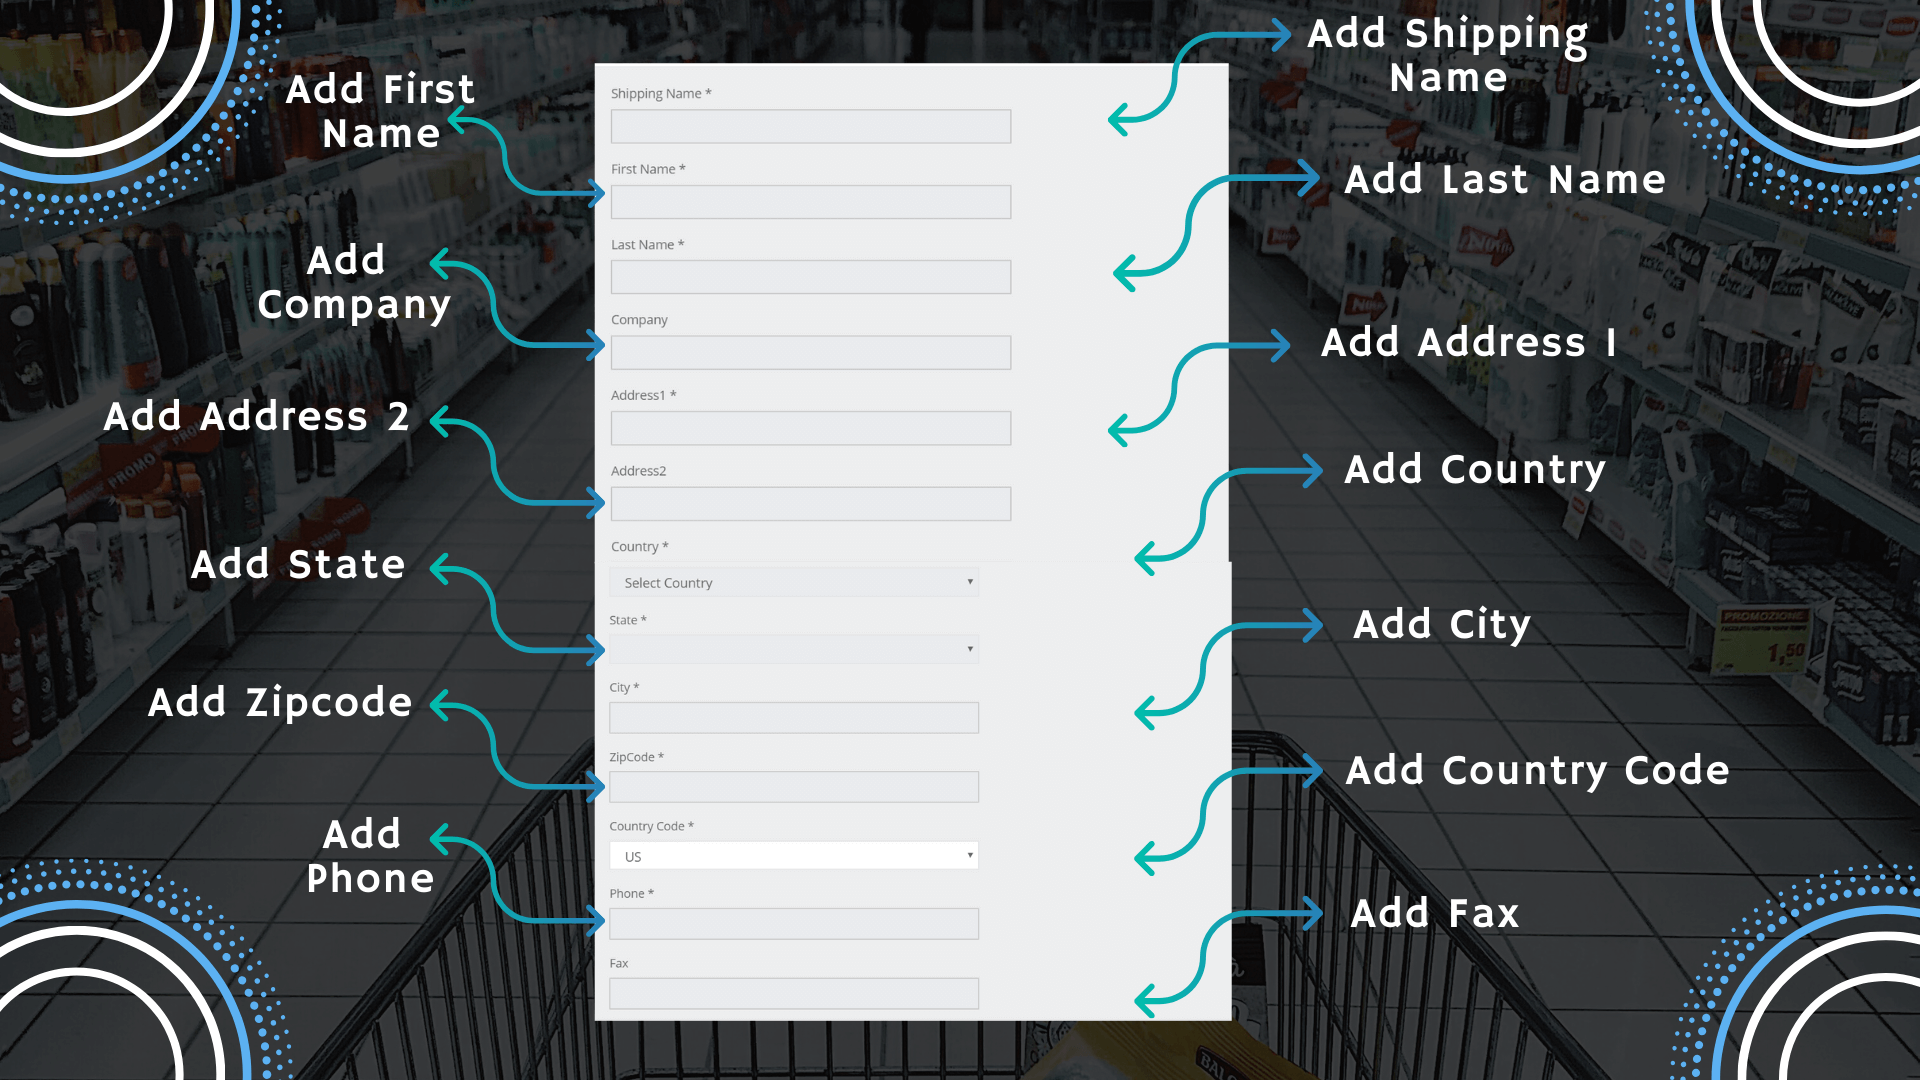
There are two checkboxes on the top, one is the edit shipping address if required and the other is to check whether the shipping address is the same as the billing address. You can edit the shipping address as required and modify the existing details. Else you can start adding shipping details from the scratch.
- The very first field is the shipping name that requires the user to enter a name that the product will get delivered to.
- Other fields are first name, last name, address, state, country, city etc. All the fields in the shipping area can be modified later.
- Phone number & fax number are also important fields in the shipping tab. However, the fax number can be left empty as it is optional and doesn’t have to be matched with the details entered in the billing address section.
After adding all the required details in customers section, billing and shipping address, now it’s time to finally submit the details and finishes adding customers for it.
Manage Customers - This section lets you manage customers that have been created in the first step. You can modify the details of the customer anytime you want.
The advantage of having a section like this it doesn’t let you regret adding the wrong information in the first place. Further, you can either edit or delete customer’s information by using a particular action.
It also gives you access to the login details of the customer. It displays the time by which the user has last been logged into the website. This way you can track user’s information in a fraction of seconds.
Now that you have created customers, managing customers is also an easy process.
Hover over to the customers' tab in the admin area. You will see a list of customers to choose from.
- You have to select customer first in order to modify their details. You can also search a customer by selecting its type above.
- The other way to find a customer is to search them by using a first name and last name.
- Besides this, you can type anything to search a customer in a separate search box. Here you can also choose the type of rows to show at a time. By default, it is set to 10 but can be changed to any number as required.
- If you go to action, you will see small five or six icons to perform operations.
The first cart icon lets the user access website as a customer.
- The search like icon allows admin to preview customer profile in a popup format. The close button is also available at the bottom.
- The email icon is designed so that you can easily send emails to the customers directly from here.
- You can also delete customers by clicking the cross button.
- The last icon lets you view the account credits of the customer.
- You can also see login details and types of customers from here. Then the edit icon allows making changes in the customer profile as required. Clicking on the edit icon opens up a customer profile that can be altered. There are fields such as email, password, confirm password, etc which already have the details of the customers. Append changes here if you want.
- Make the required changes in the fields mentioned and then move on to the next step. You can also assign a new role for the customer. There are several roles specified here such as revision team, R&D, production team etc. Choose any one from the dropdown. Again modify the discount percent if needed. Set status of the user as active or disabled. There is a new field here called user listing that decides whether the user is blacklist or whitelist. Click on next to change address fields in the corresponding billing and shipping address. If you don’t wish to make changes in the billing and shipping tabs, leave it as it is.
Manage Roles - Managing roles is one of the crucial elements whereby the customers are provided valid authority to access a website according to the roles typically defined for them. The roles should be assigned carefully to the customers depending upon the current need of the business. Each type of customer has its own set of access and privileges which will be defined by the admin. The admin can also custom define a privilege to modify the capabilities of the users while accessing a website. This on the other hand restricts the users to take part in any unwanted activity on the website.
The “manage roles” tab allows the admin to add or edit roles here. Review both “add” and “edit” commands and do the needful. Let’s first discuss adding a role for the customers.
Click on add role and a new screen will appear to enter the desired information. Start by adding required information in the fields below:
- Enter name, description of the role.
- Select desired permissions from the inherit dropdown. The inherit permissions from the tab is used to take over permissions from other roles. The roles from which permissions are inherited will work the same.
However, those roles can be passed on to the other customers. It means that there would be some roles that are already existing for the customers and the admin may like to import and assign the same roles for the new customers in this section.
- You can choose desired options from the dropdown and proceed to add other information.
- Below are the several checkboxes that act as capabilities and will be assigned to a particular role. You can alter these options anytime later whenever needed.
- After you have finished adding roles and its required capabilities, submit it by clicking add new role. Similarly editing a role requires you to check or uncheck capabilities or any other content. The role can be modified according to the need.
The “edit roles” section lets the administrator to completely customize a role by adding or manipulating details.
The details exist in the form of authentication and privileges that can be modified from time to time.
All the existing roles will appear in front of the “manage roles” section.
You have to choose which role to edit and then making desired changes. There is also an option to delete the role created previously. This can be done by clicking the cross button in the Actions column.
The edit action can be performed by clicking the pencil icon placed next to the cross button. Apply modifications in the selected role, and save it to finish editing roles.